Fried Rice, so nice!

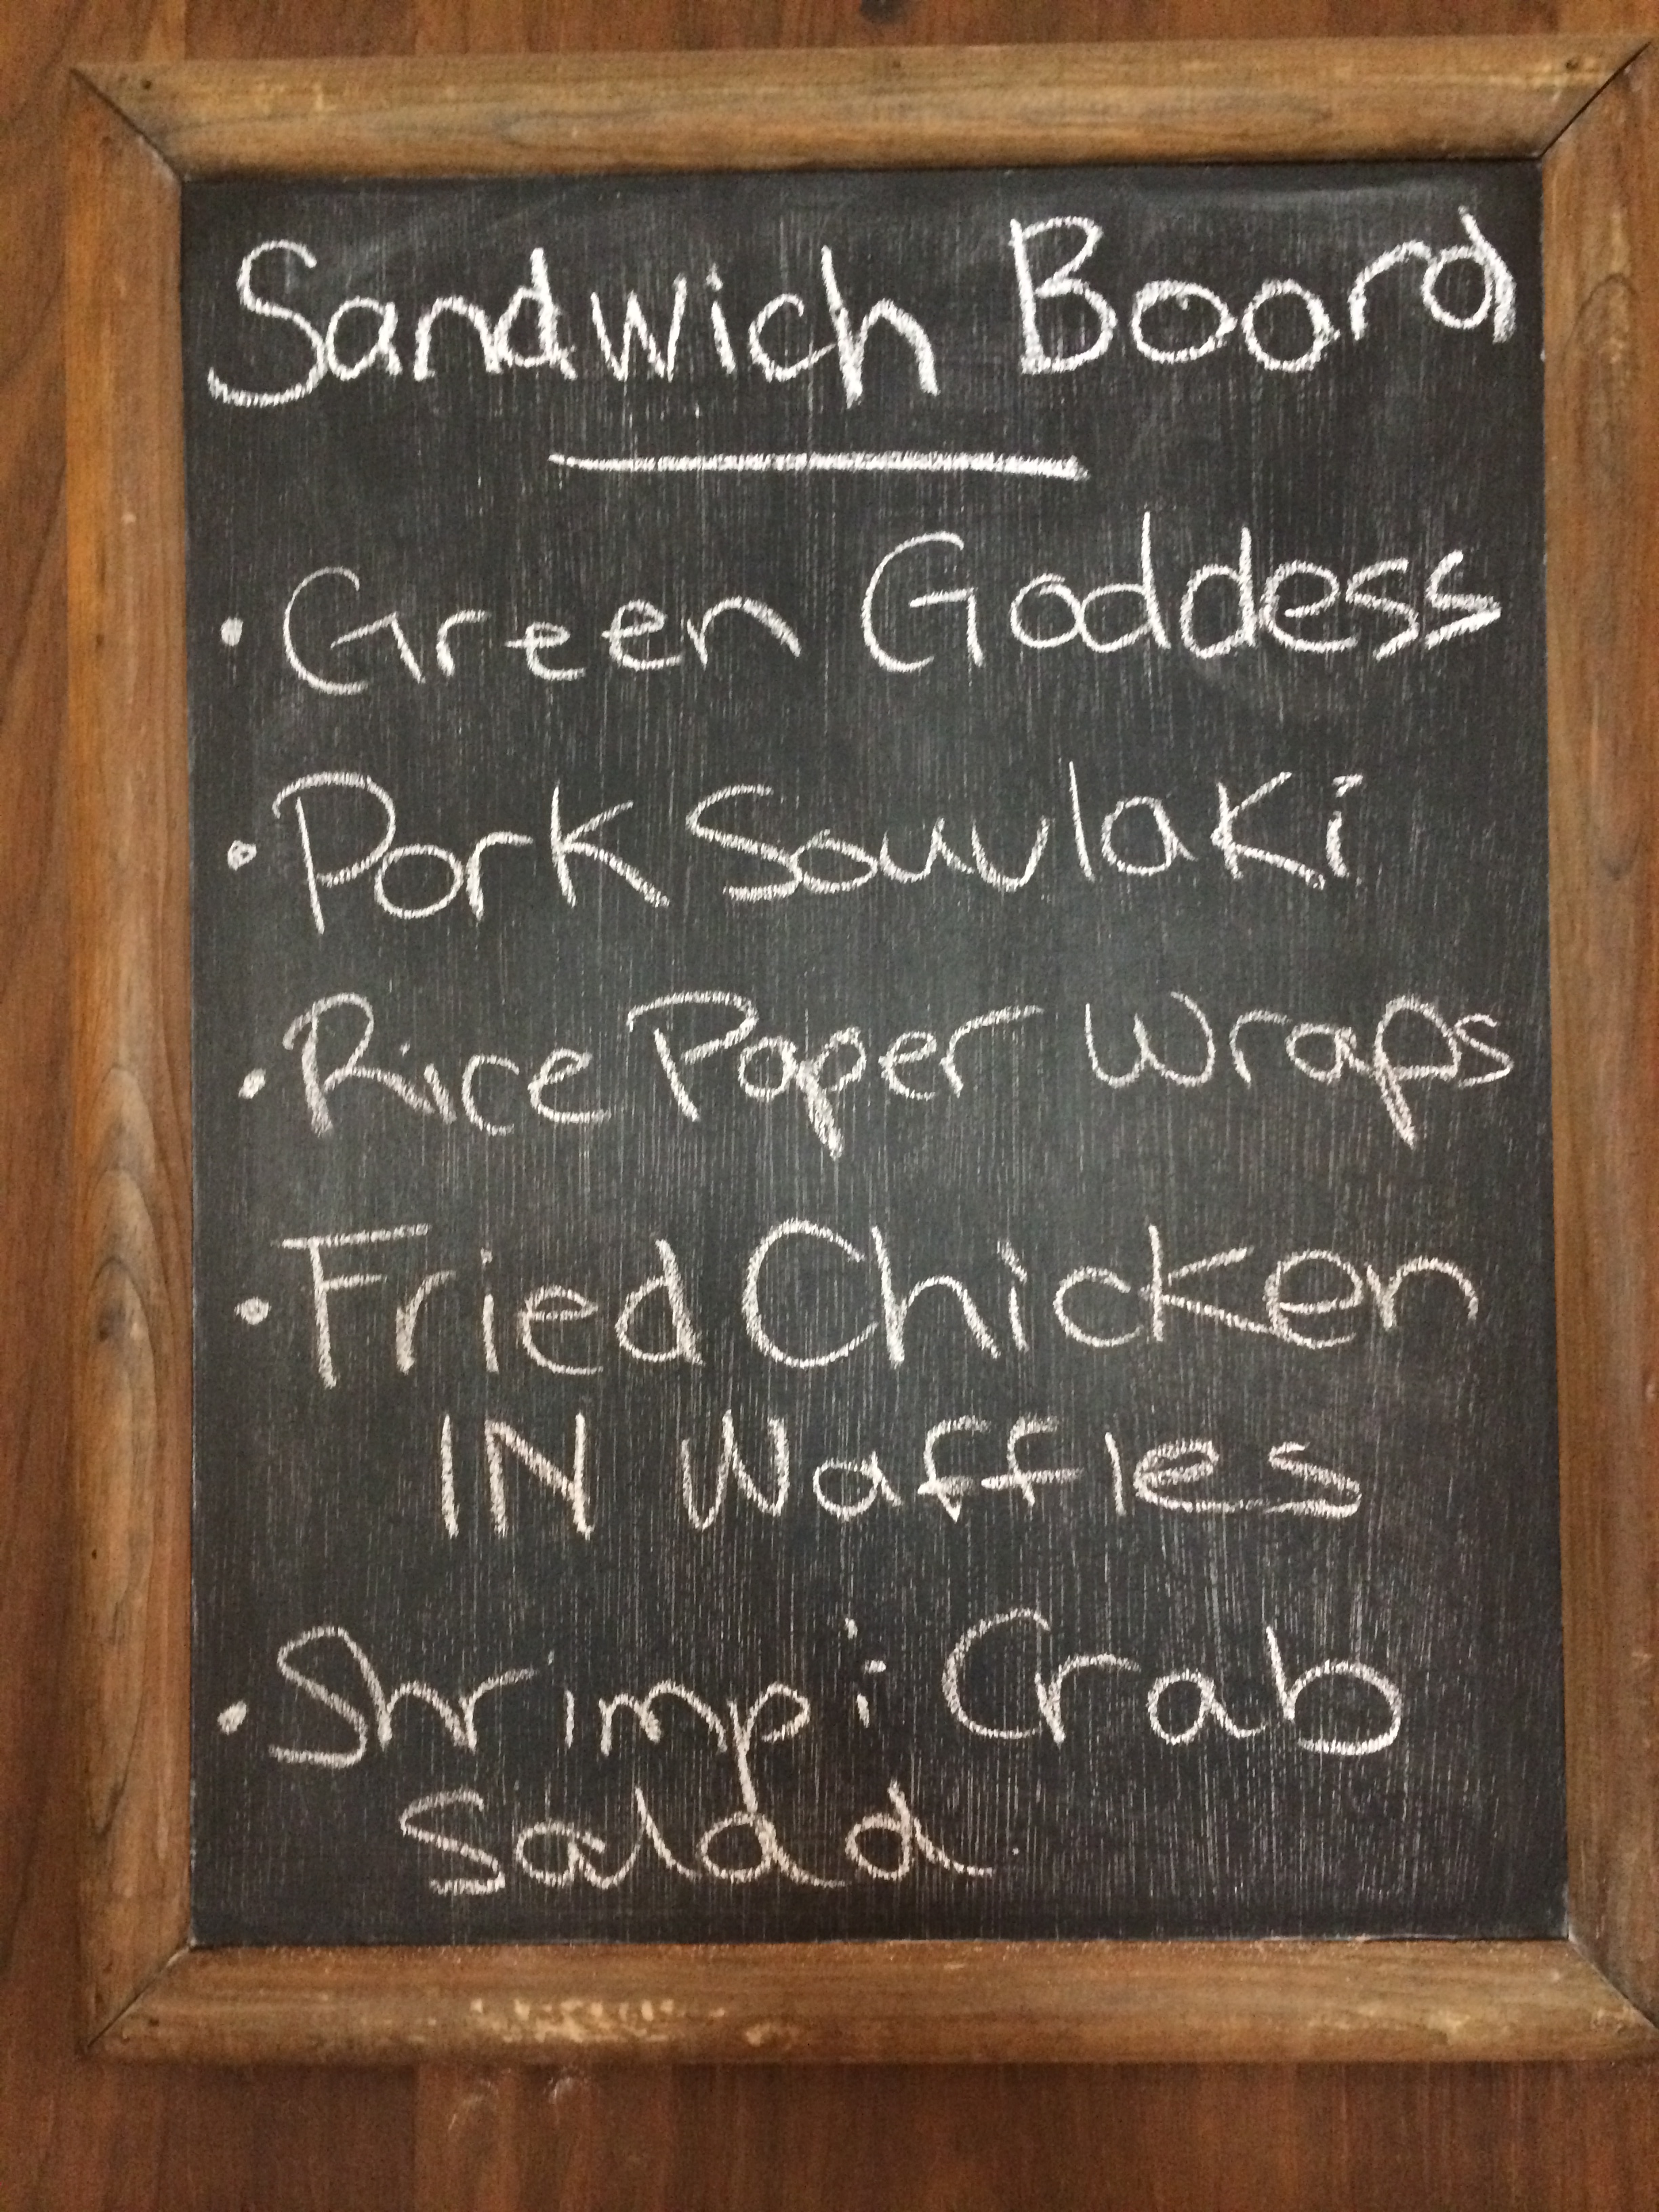
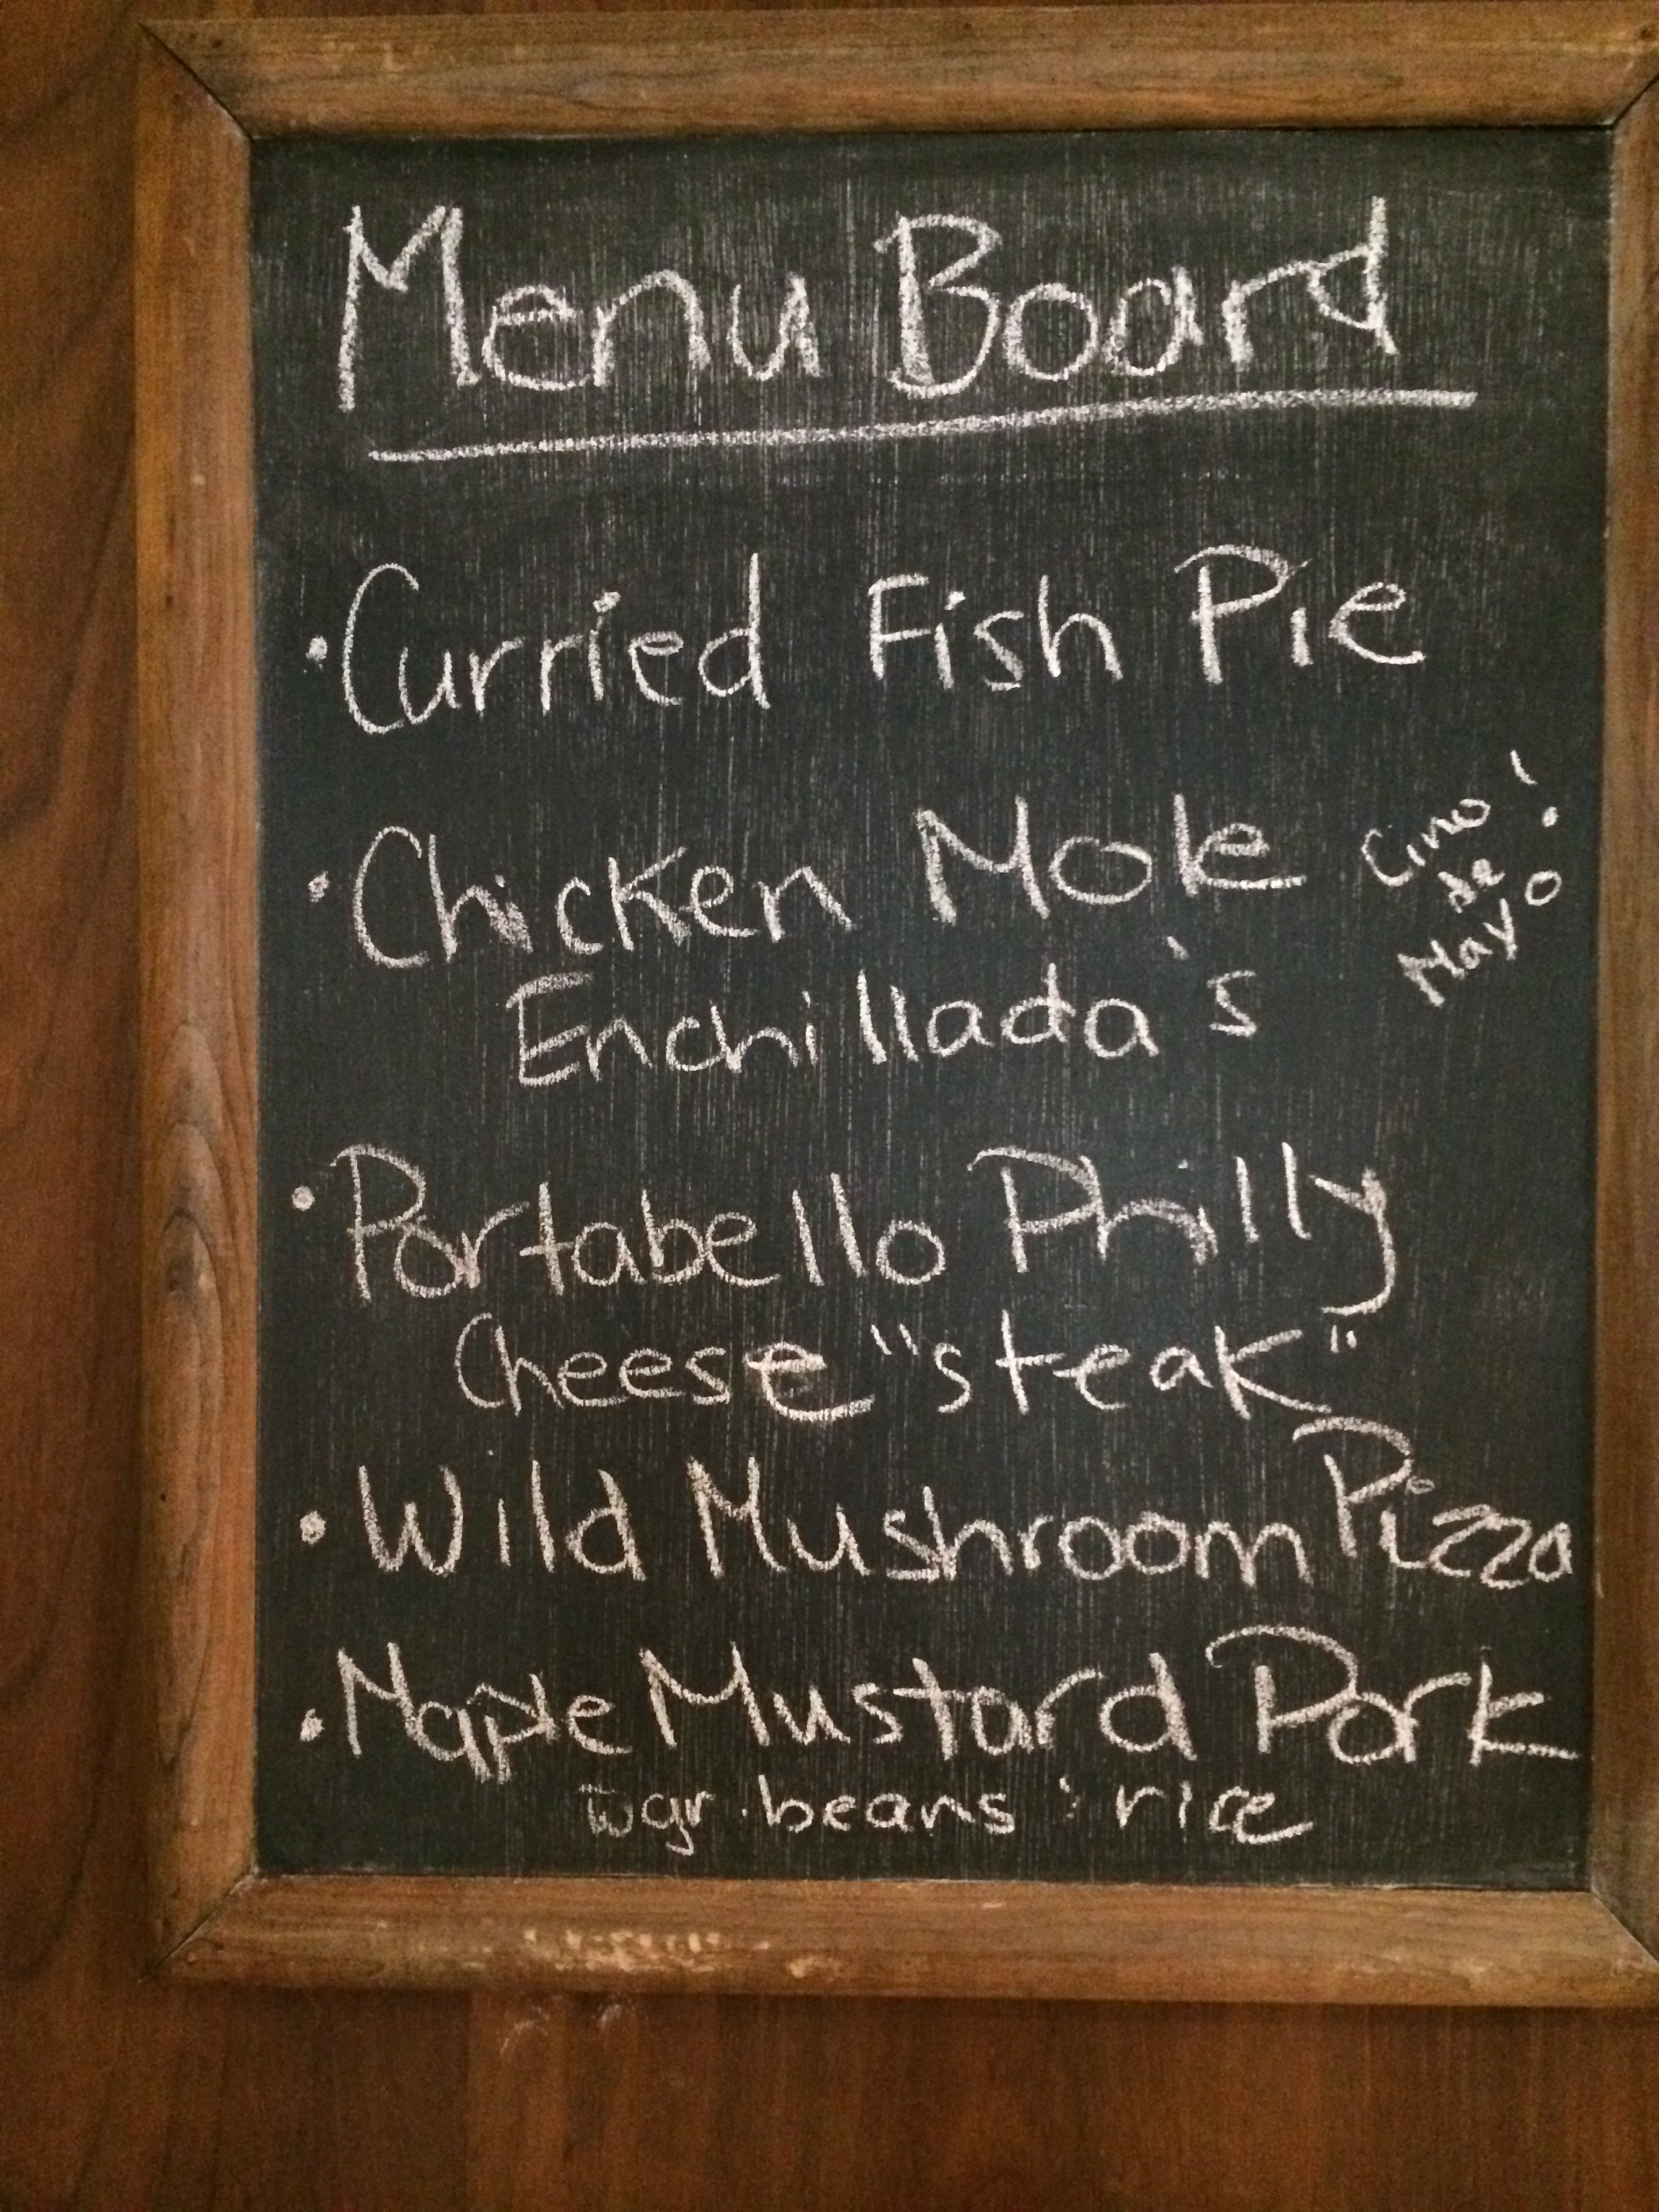
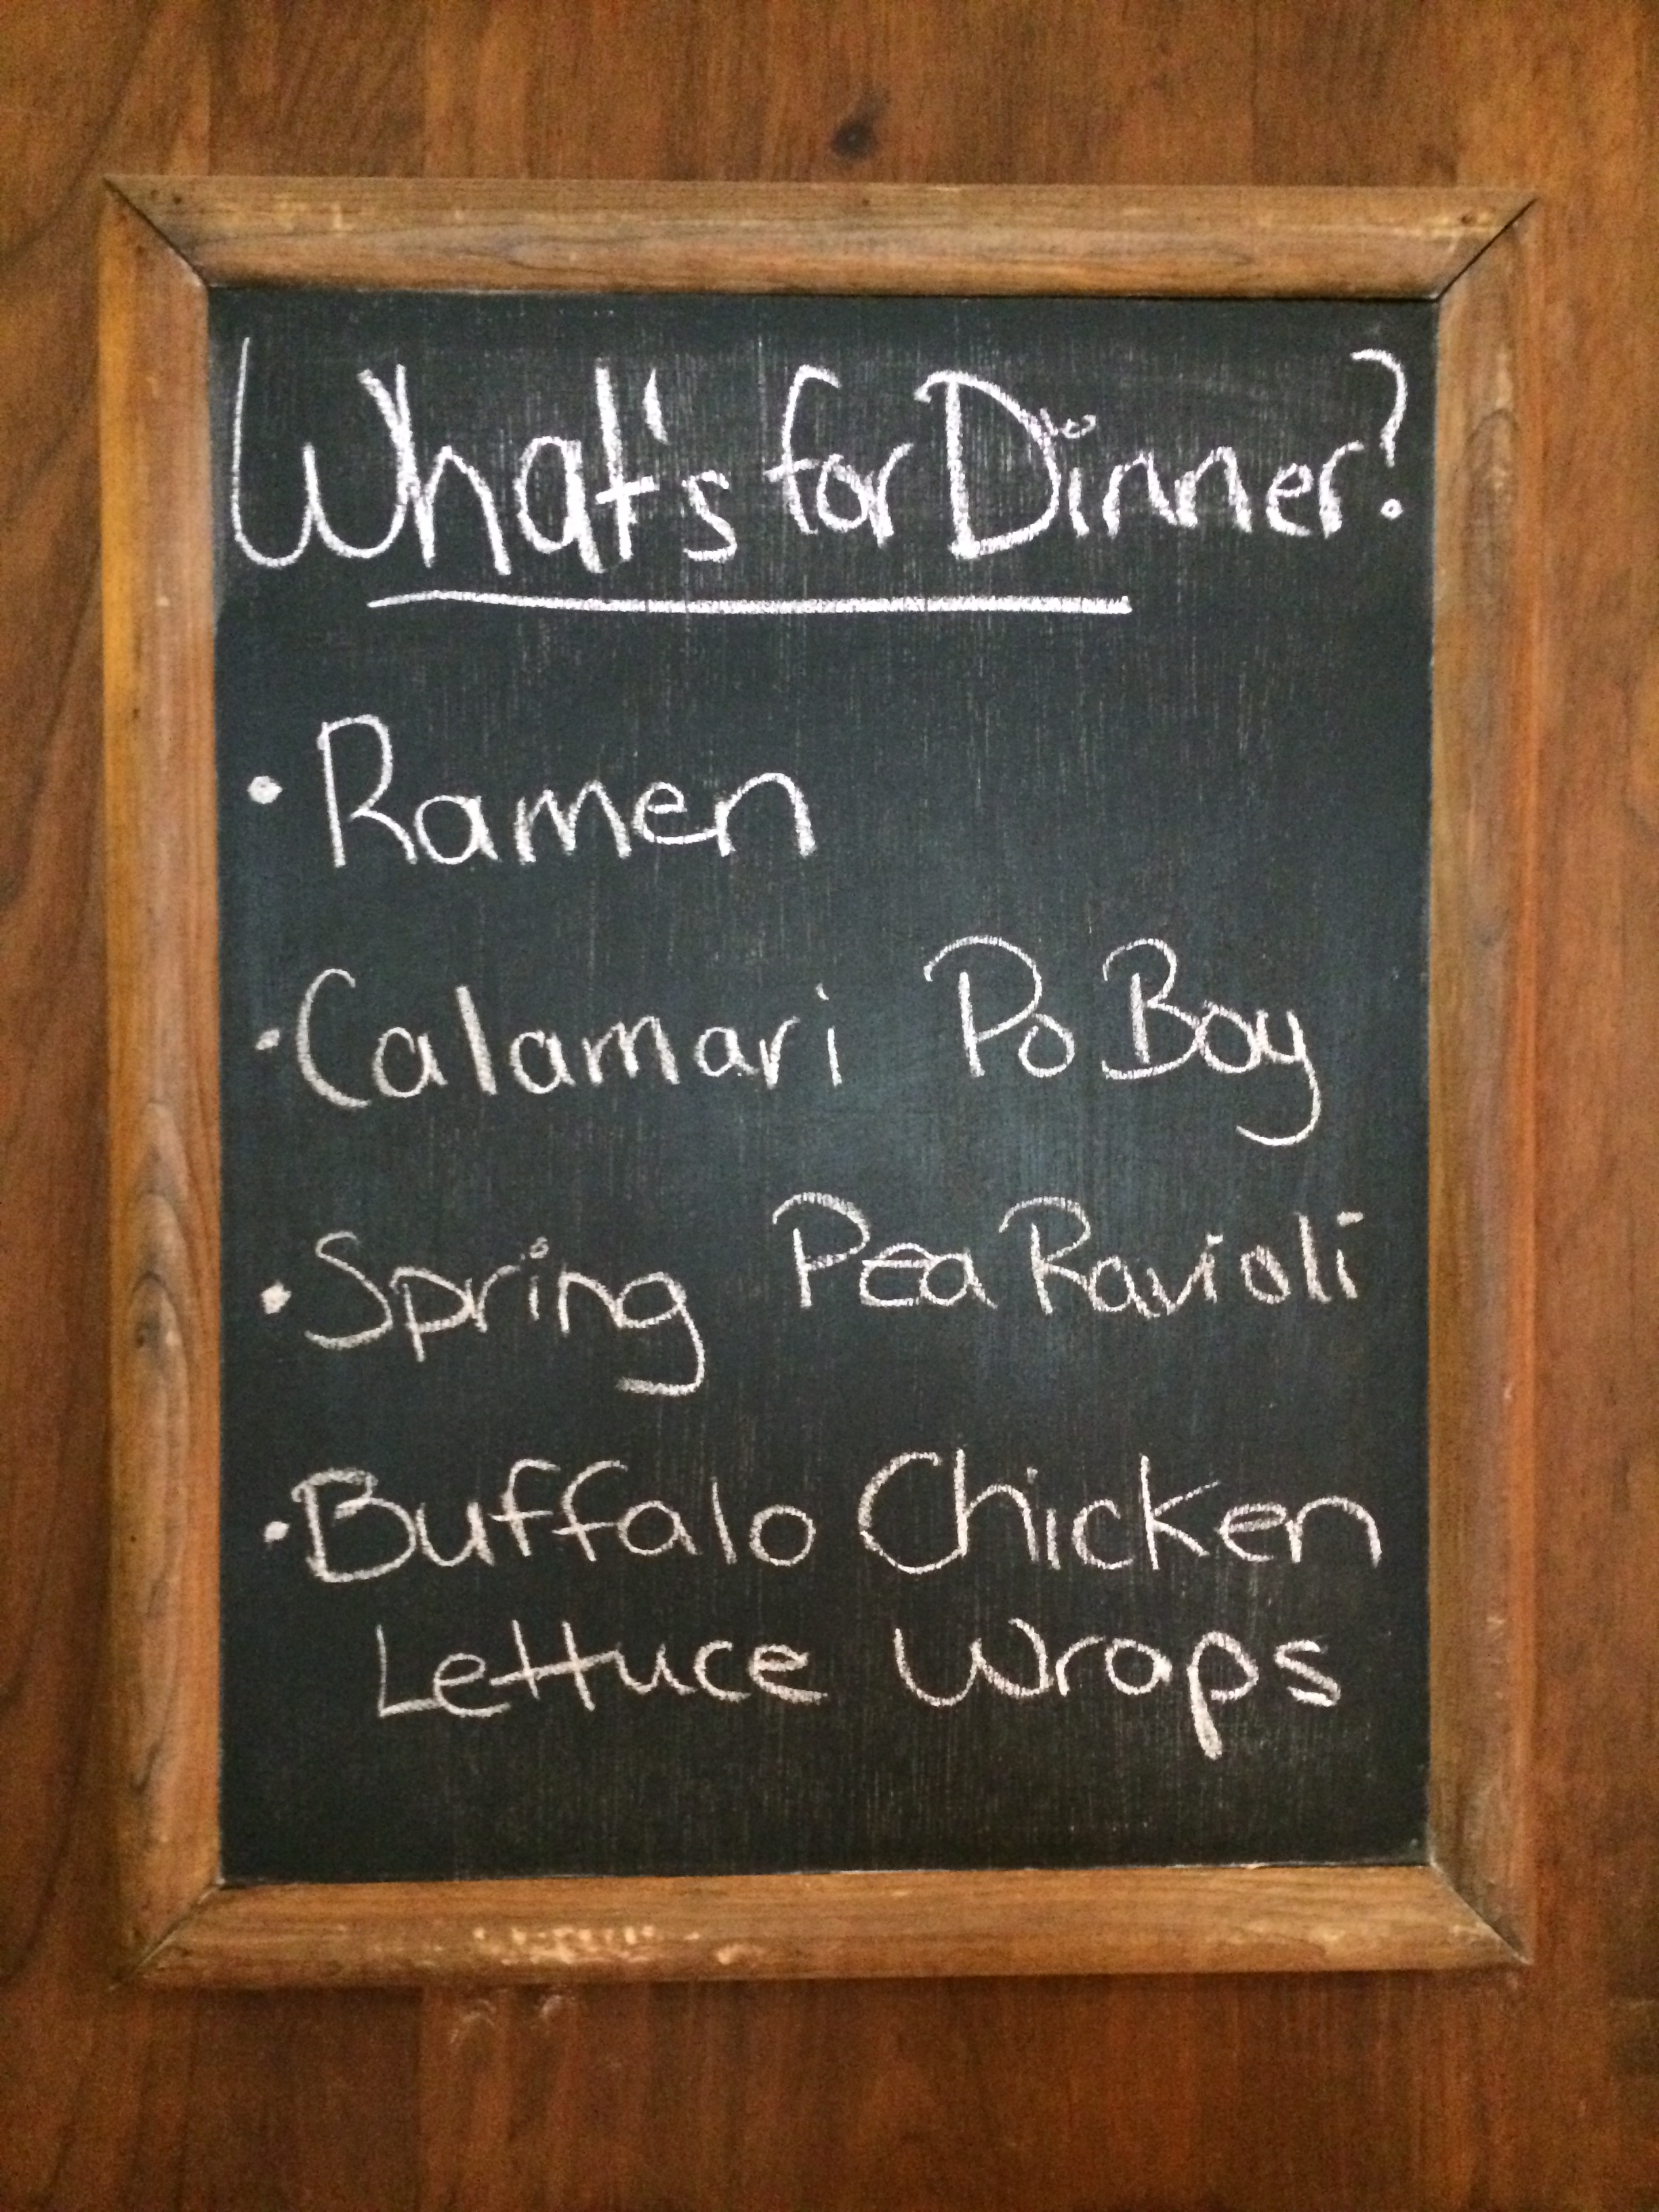
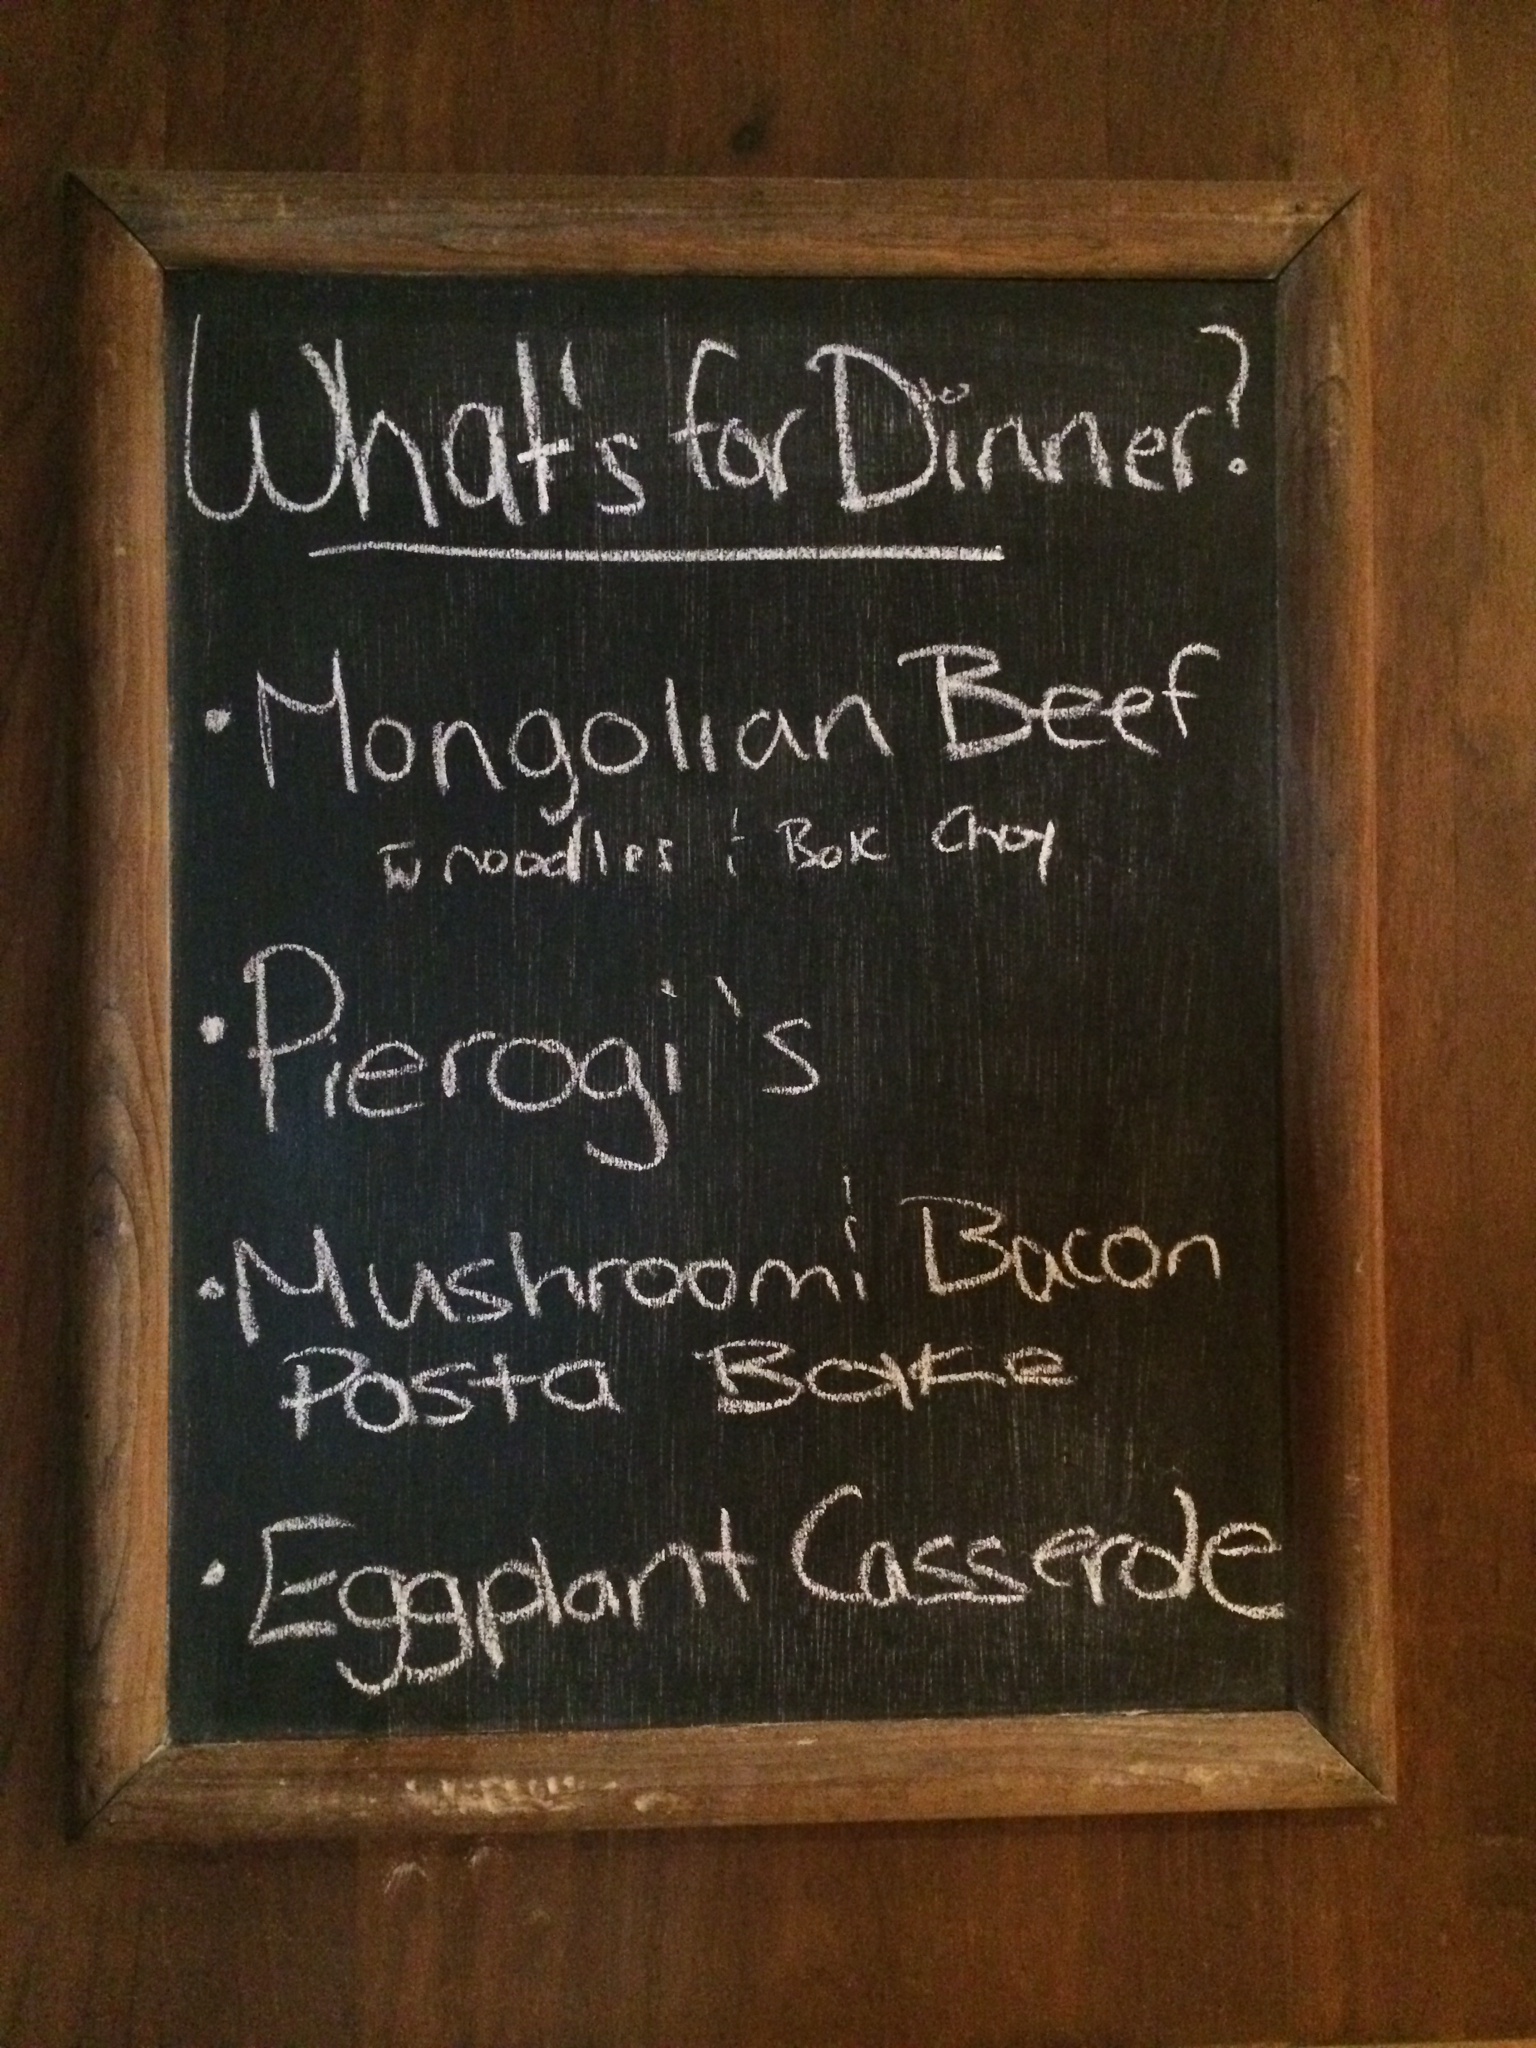
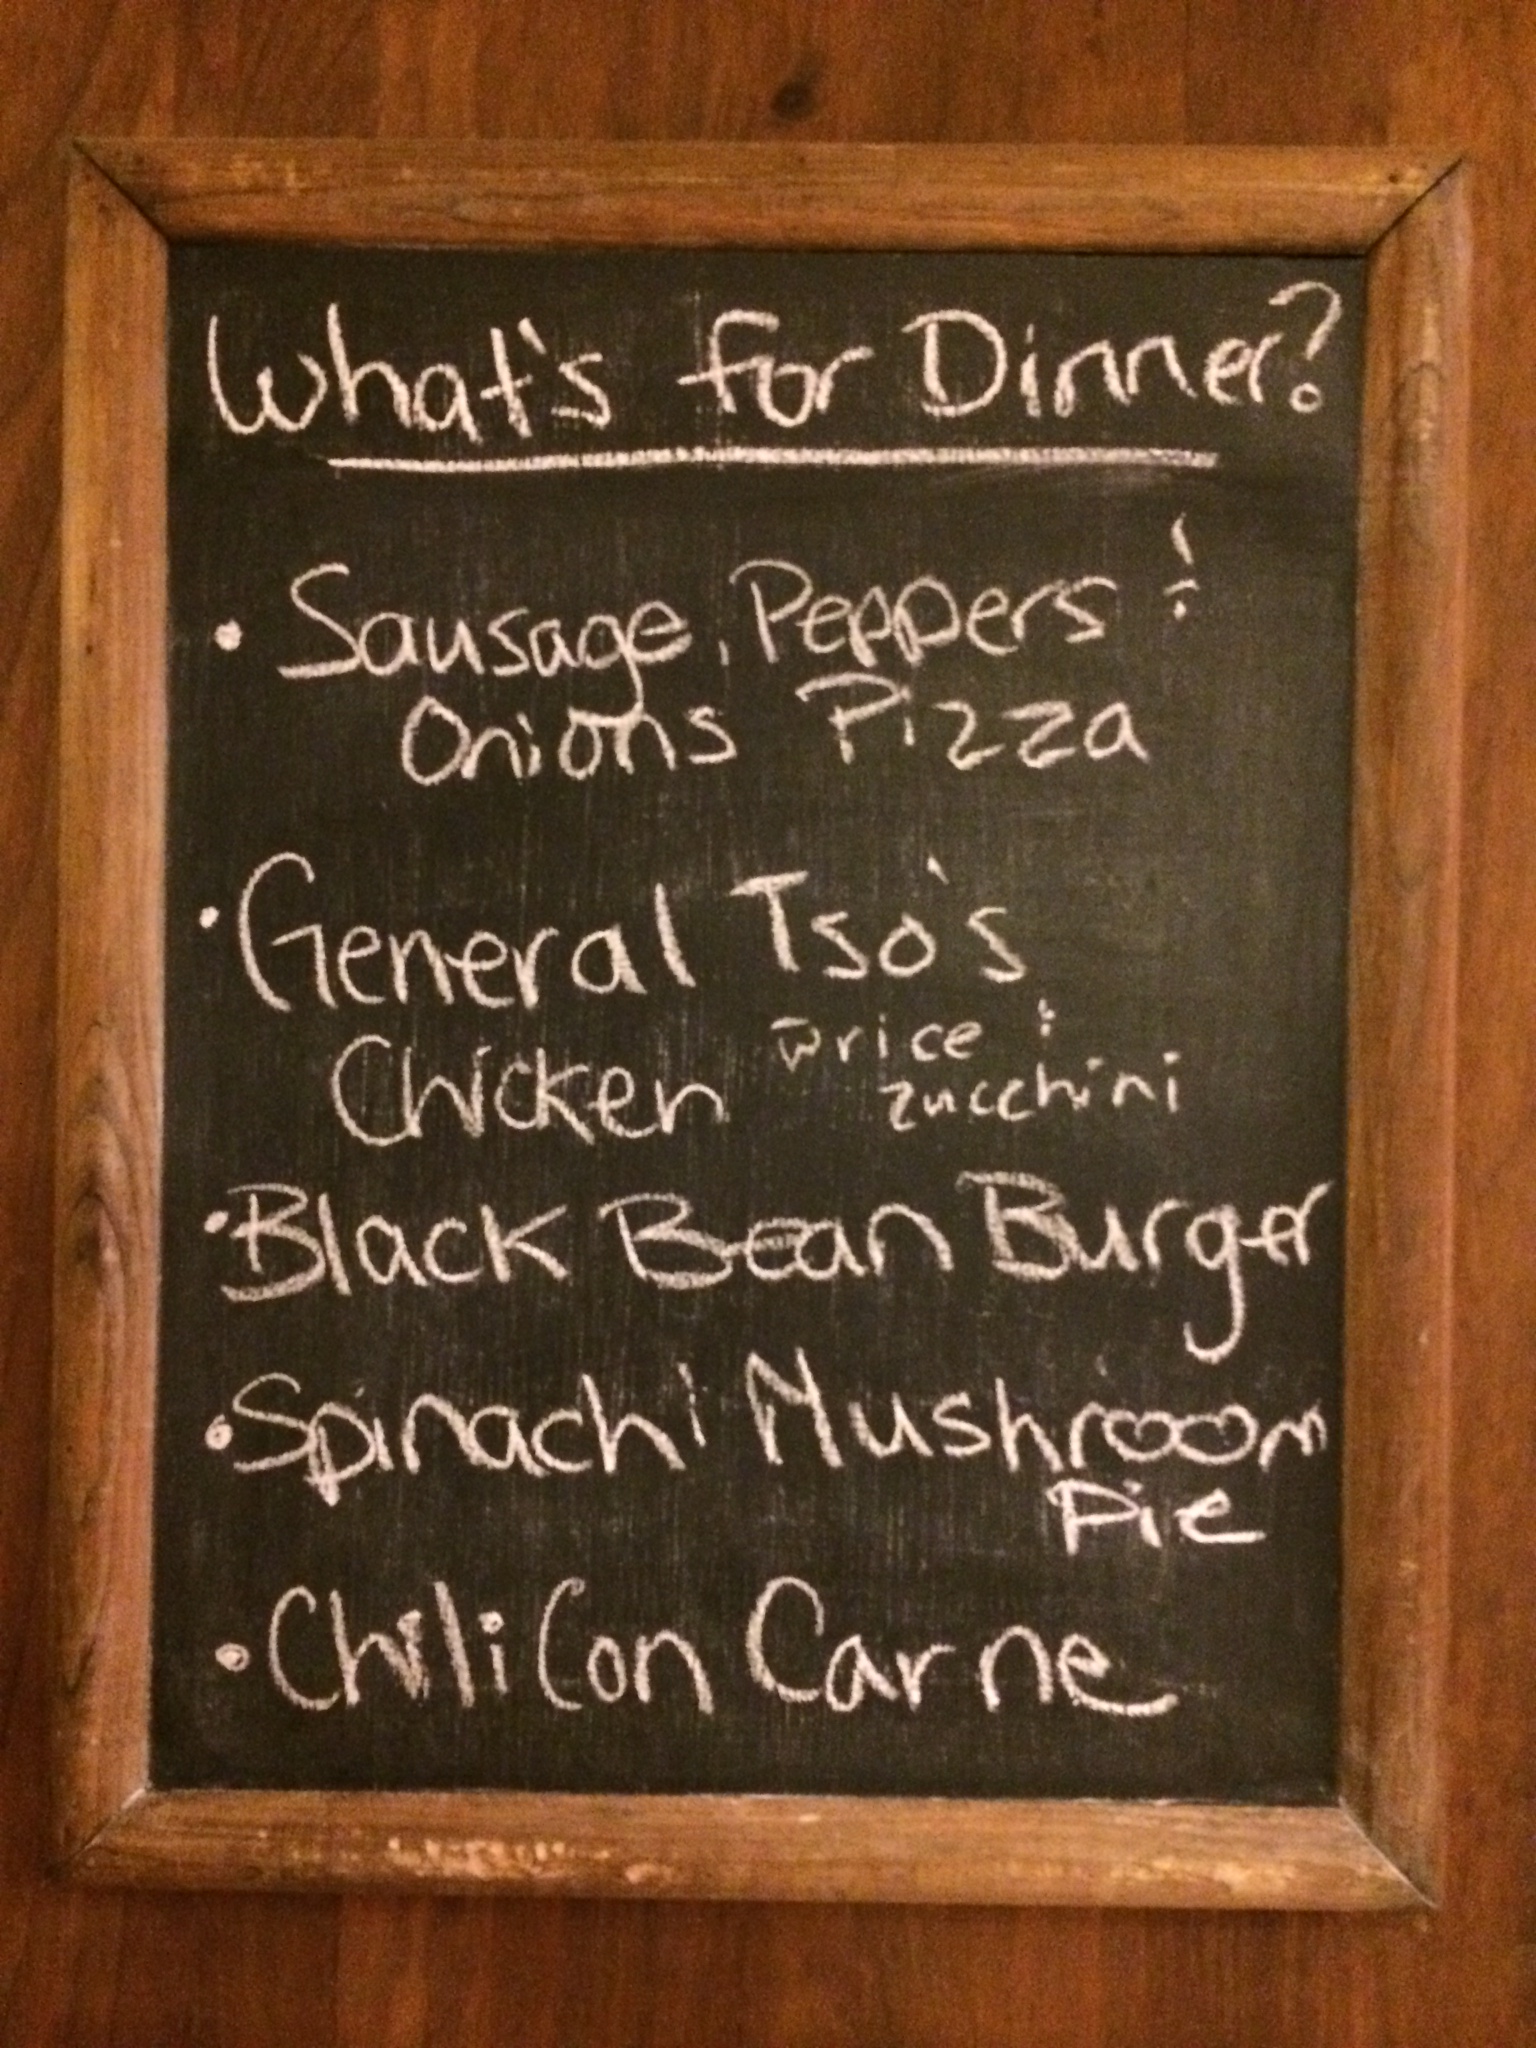
After the awesomeness that was the sandwich board last week, we have gone back to a random board with a mixture of proteins and just recipes that make us happy.

Menu Board Week of June 1st

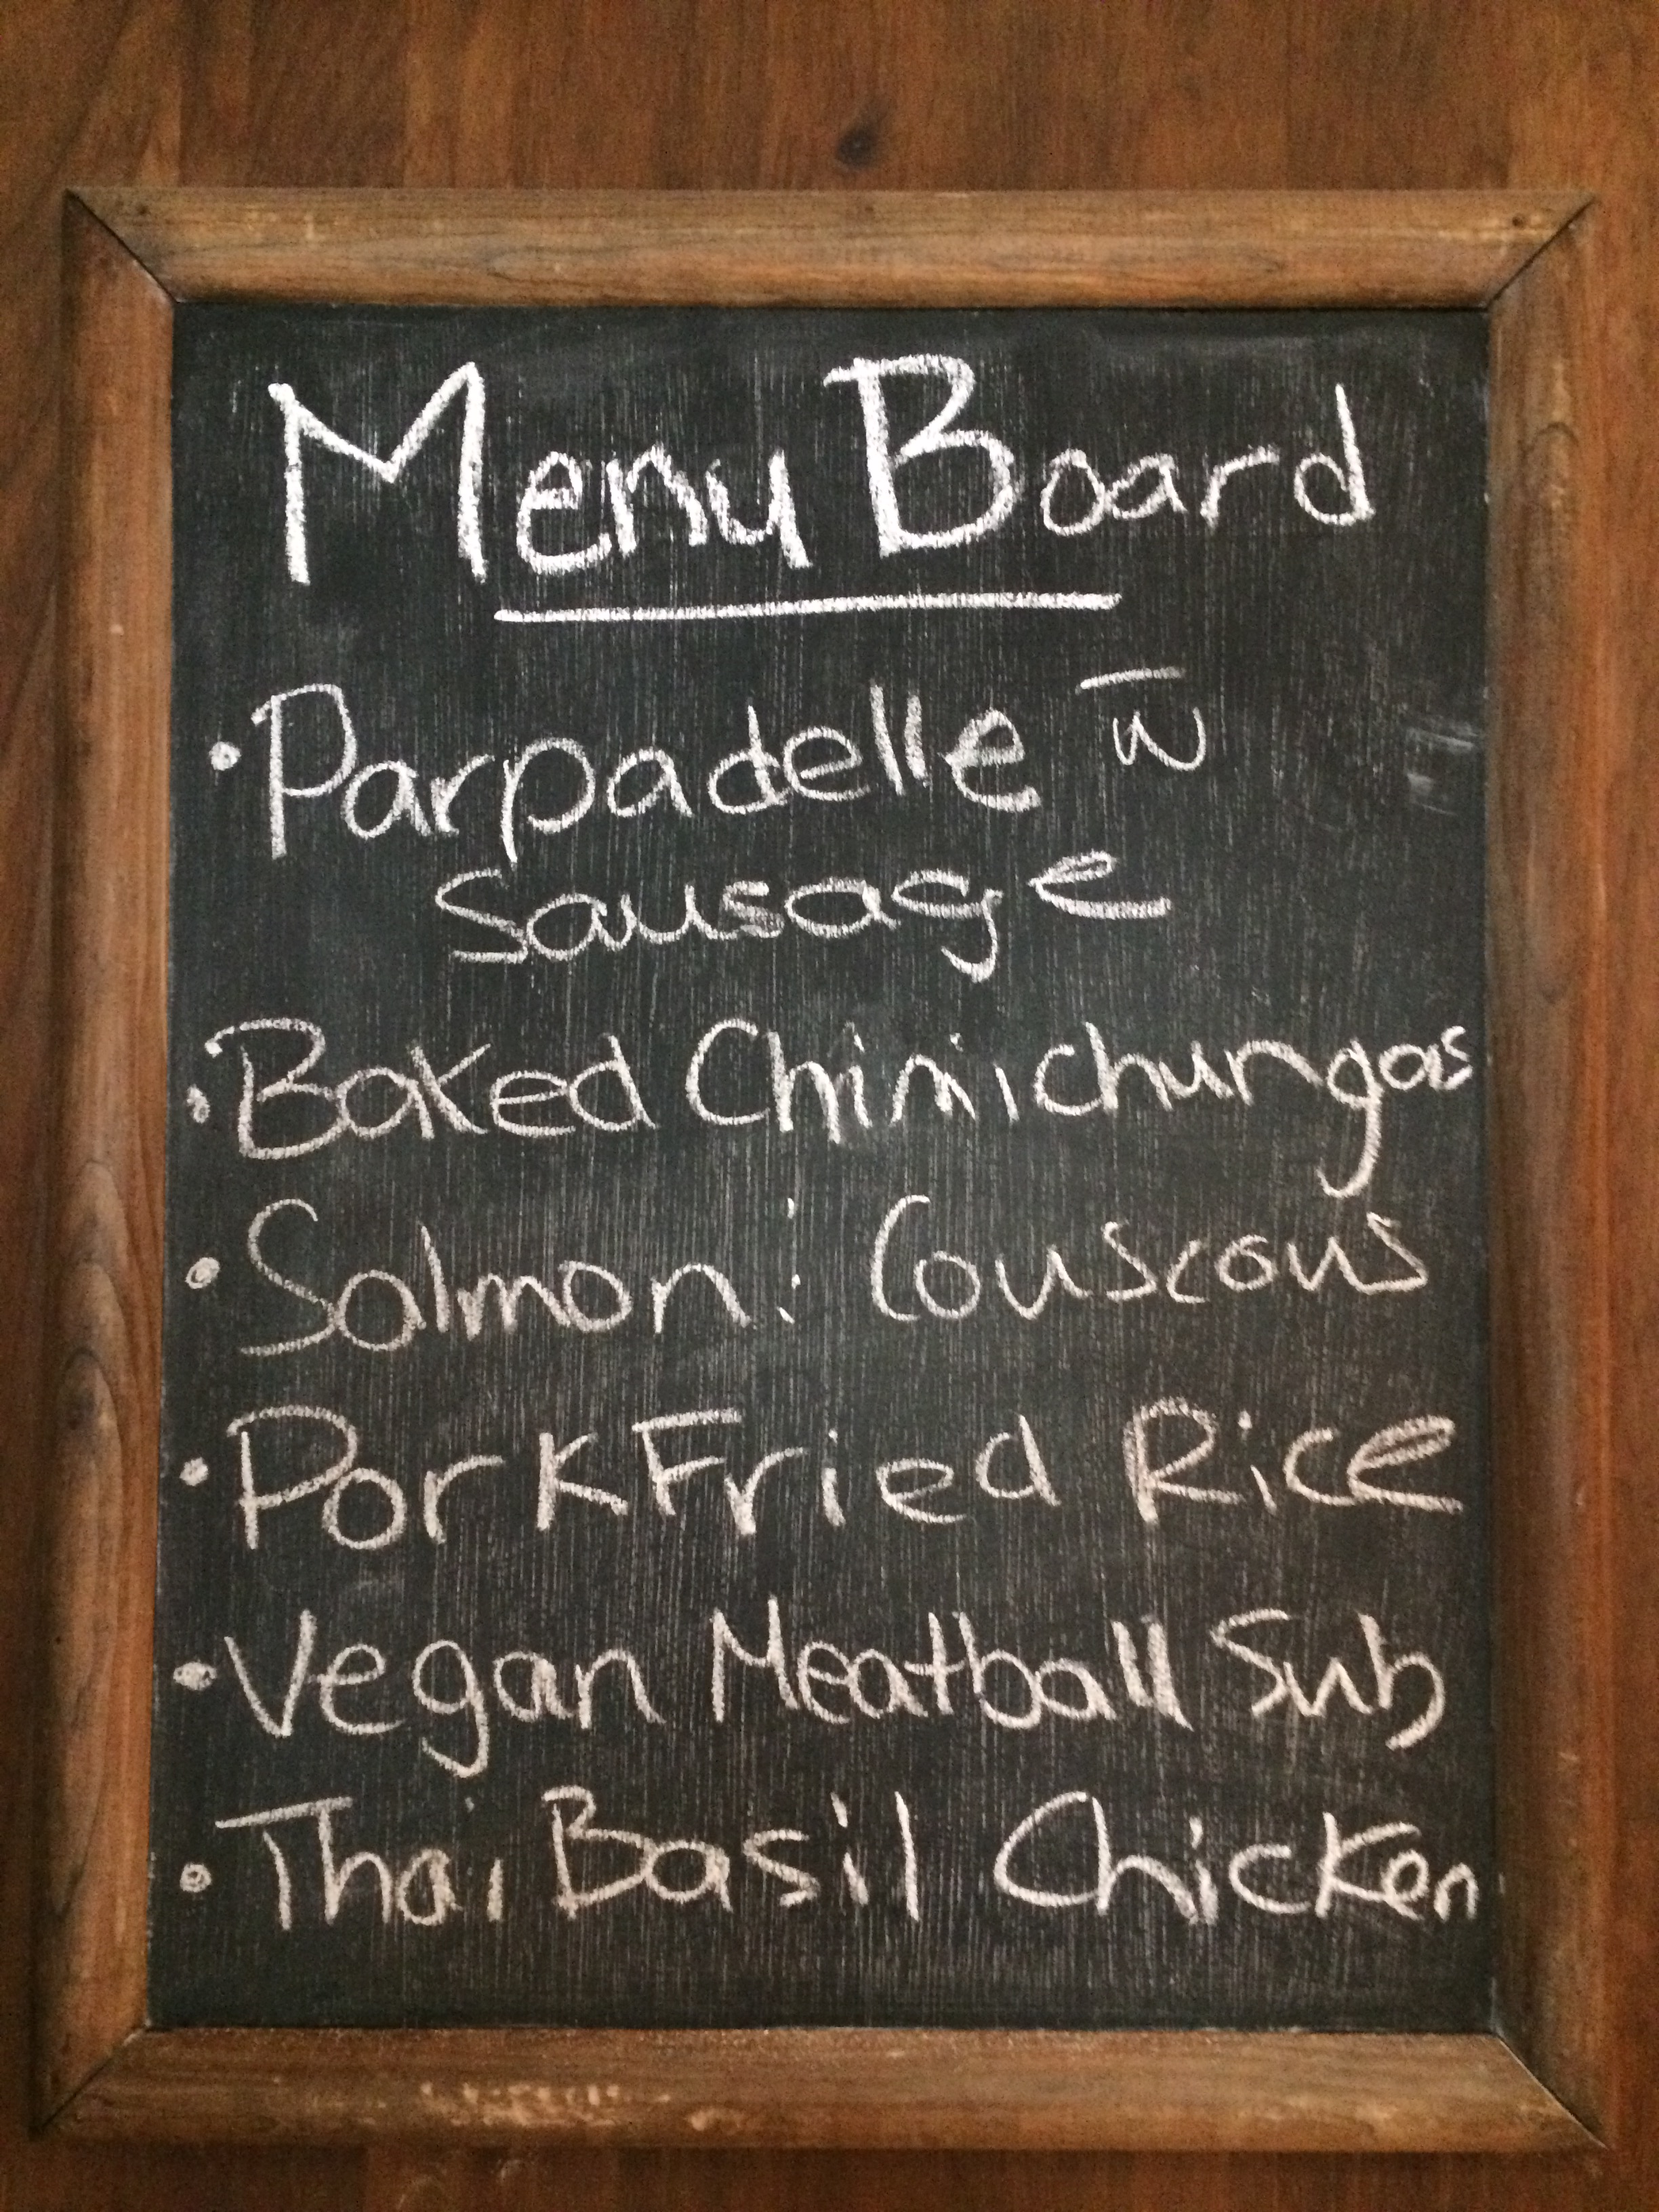
Last night we made the Thai Basil Chicken and I made a double batch of rice to go with this dish.  I also feel the need to let you know that the Basil came from my container garden on my balcony.  I am very excited to be growing Thai Basil this year.  We have used it in a few meals now.  But back to the rice….

The reason for the double batch of rice is because I wanted to make Pork Fried Rice.  And it is absolutely essential to a good fried rice to have leftover cold rice.  Why you ask?  Simple.  When you put the leftover rice in the fridge and it cools it separates into individual grains of rice.  Perfect for frying.  If you were to use fresh rice the moisture in the rice would end up steaming the dish instead of frying it.  This is after all called Fried rice!

Fried rice is an important dish in China and is sometimes served as the penultimate dish in Chinese banquets, just before dessert.  So while Fried Rice is pretty synonymous with Chinese take-out it is interesting to know that there are many regional ways that fried rice is prepared outside of China.  Nasi Goreng, typically found in Indonesia or Malaysia is a spicier cousin to the Chinese fried rice.  Khao Pad is a Thai style fried rice and is typically made with Jasmine rice, which differs from the Chinese version which is typically a long grain white rice.

Prep
Prep

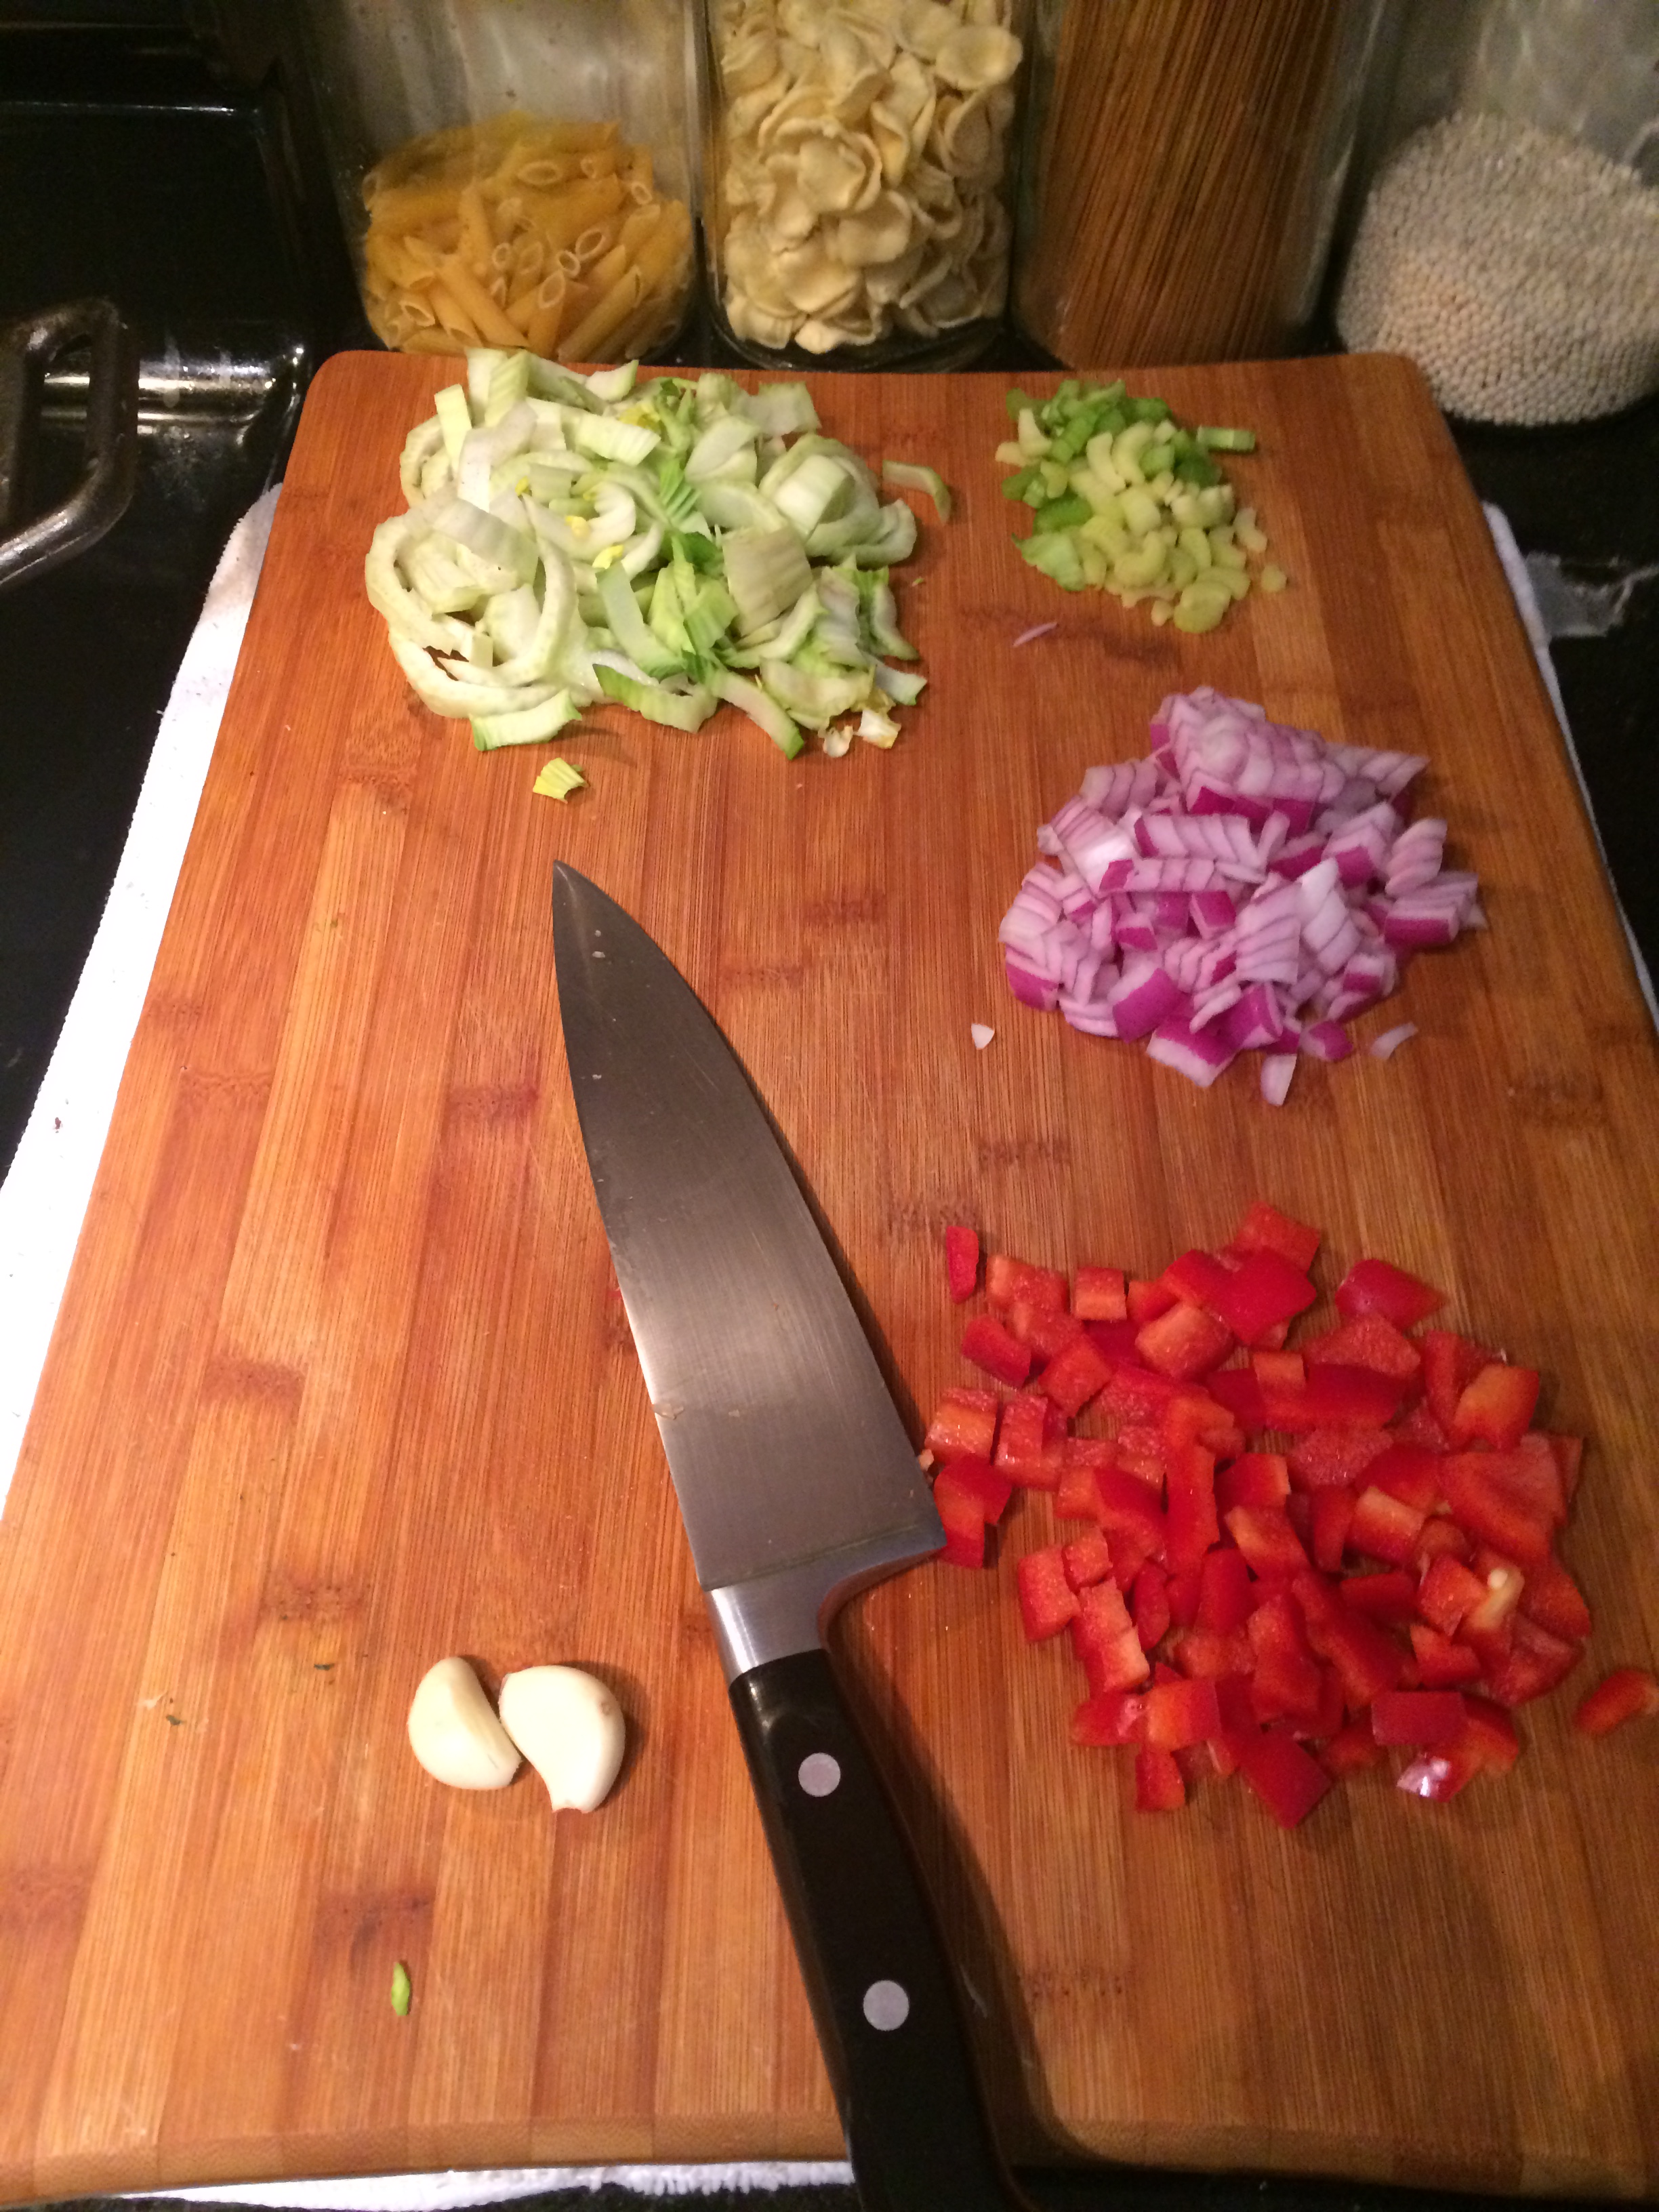
But really it comes down to the fact that fried rice is a great way to use up leftovers.  It starts with leftover rice after all.  Add a protein (in this case pork), add chopped vegetables, eggs, soya sauce and rice and you are done in 10 minutes.  You can really add whatever you want to your fried rice, so long as you start with leftover rice!

Pork Fried Rice

Ingredients

  • 2 tablespoons canola oil
  • 1 pound pork cut into 1/2 inch chunks
  • 2 cloves are garlic diced
  • 1 tablespoon grated ginger
  • 1/4 teaspoon pepper
  • 2 cups cooked rice
  • 1 small red onion, diced
  • 2 eggs, scrambled
  • half red peppers diced
  • 2 large Bok Choy chopped
  • stick of celery chopped
  • 1 tablespoon soy sauce
  • 1 teaspoon Sriracha
  • black sesame seeds
  • small handful cilantro finely chopped
Pork Fried RIce
Pork Fried Rice (minus the eggs…that was in the hubby’s dish)

Directions

With the wok over medium heat, add a tablespoon of oil and sauté the pork until browned.  Add the onions and sauté until translucent and then add the garlic and ginger.

Add the peppers, bok choy and celery.  You want these to stay crunchy so cook until slightly softened.

Add the other tablespoon of oil and the rice and mix well.

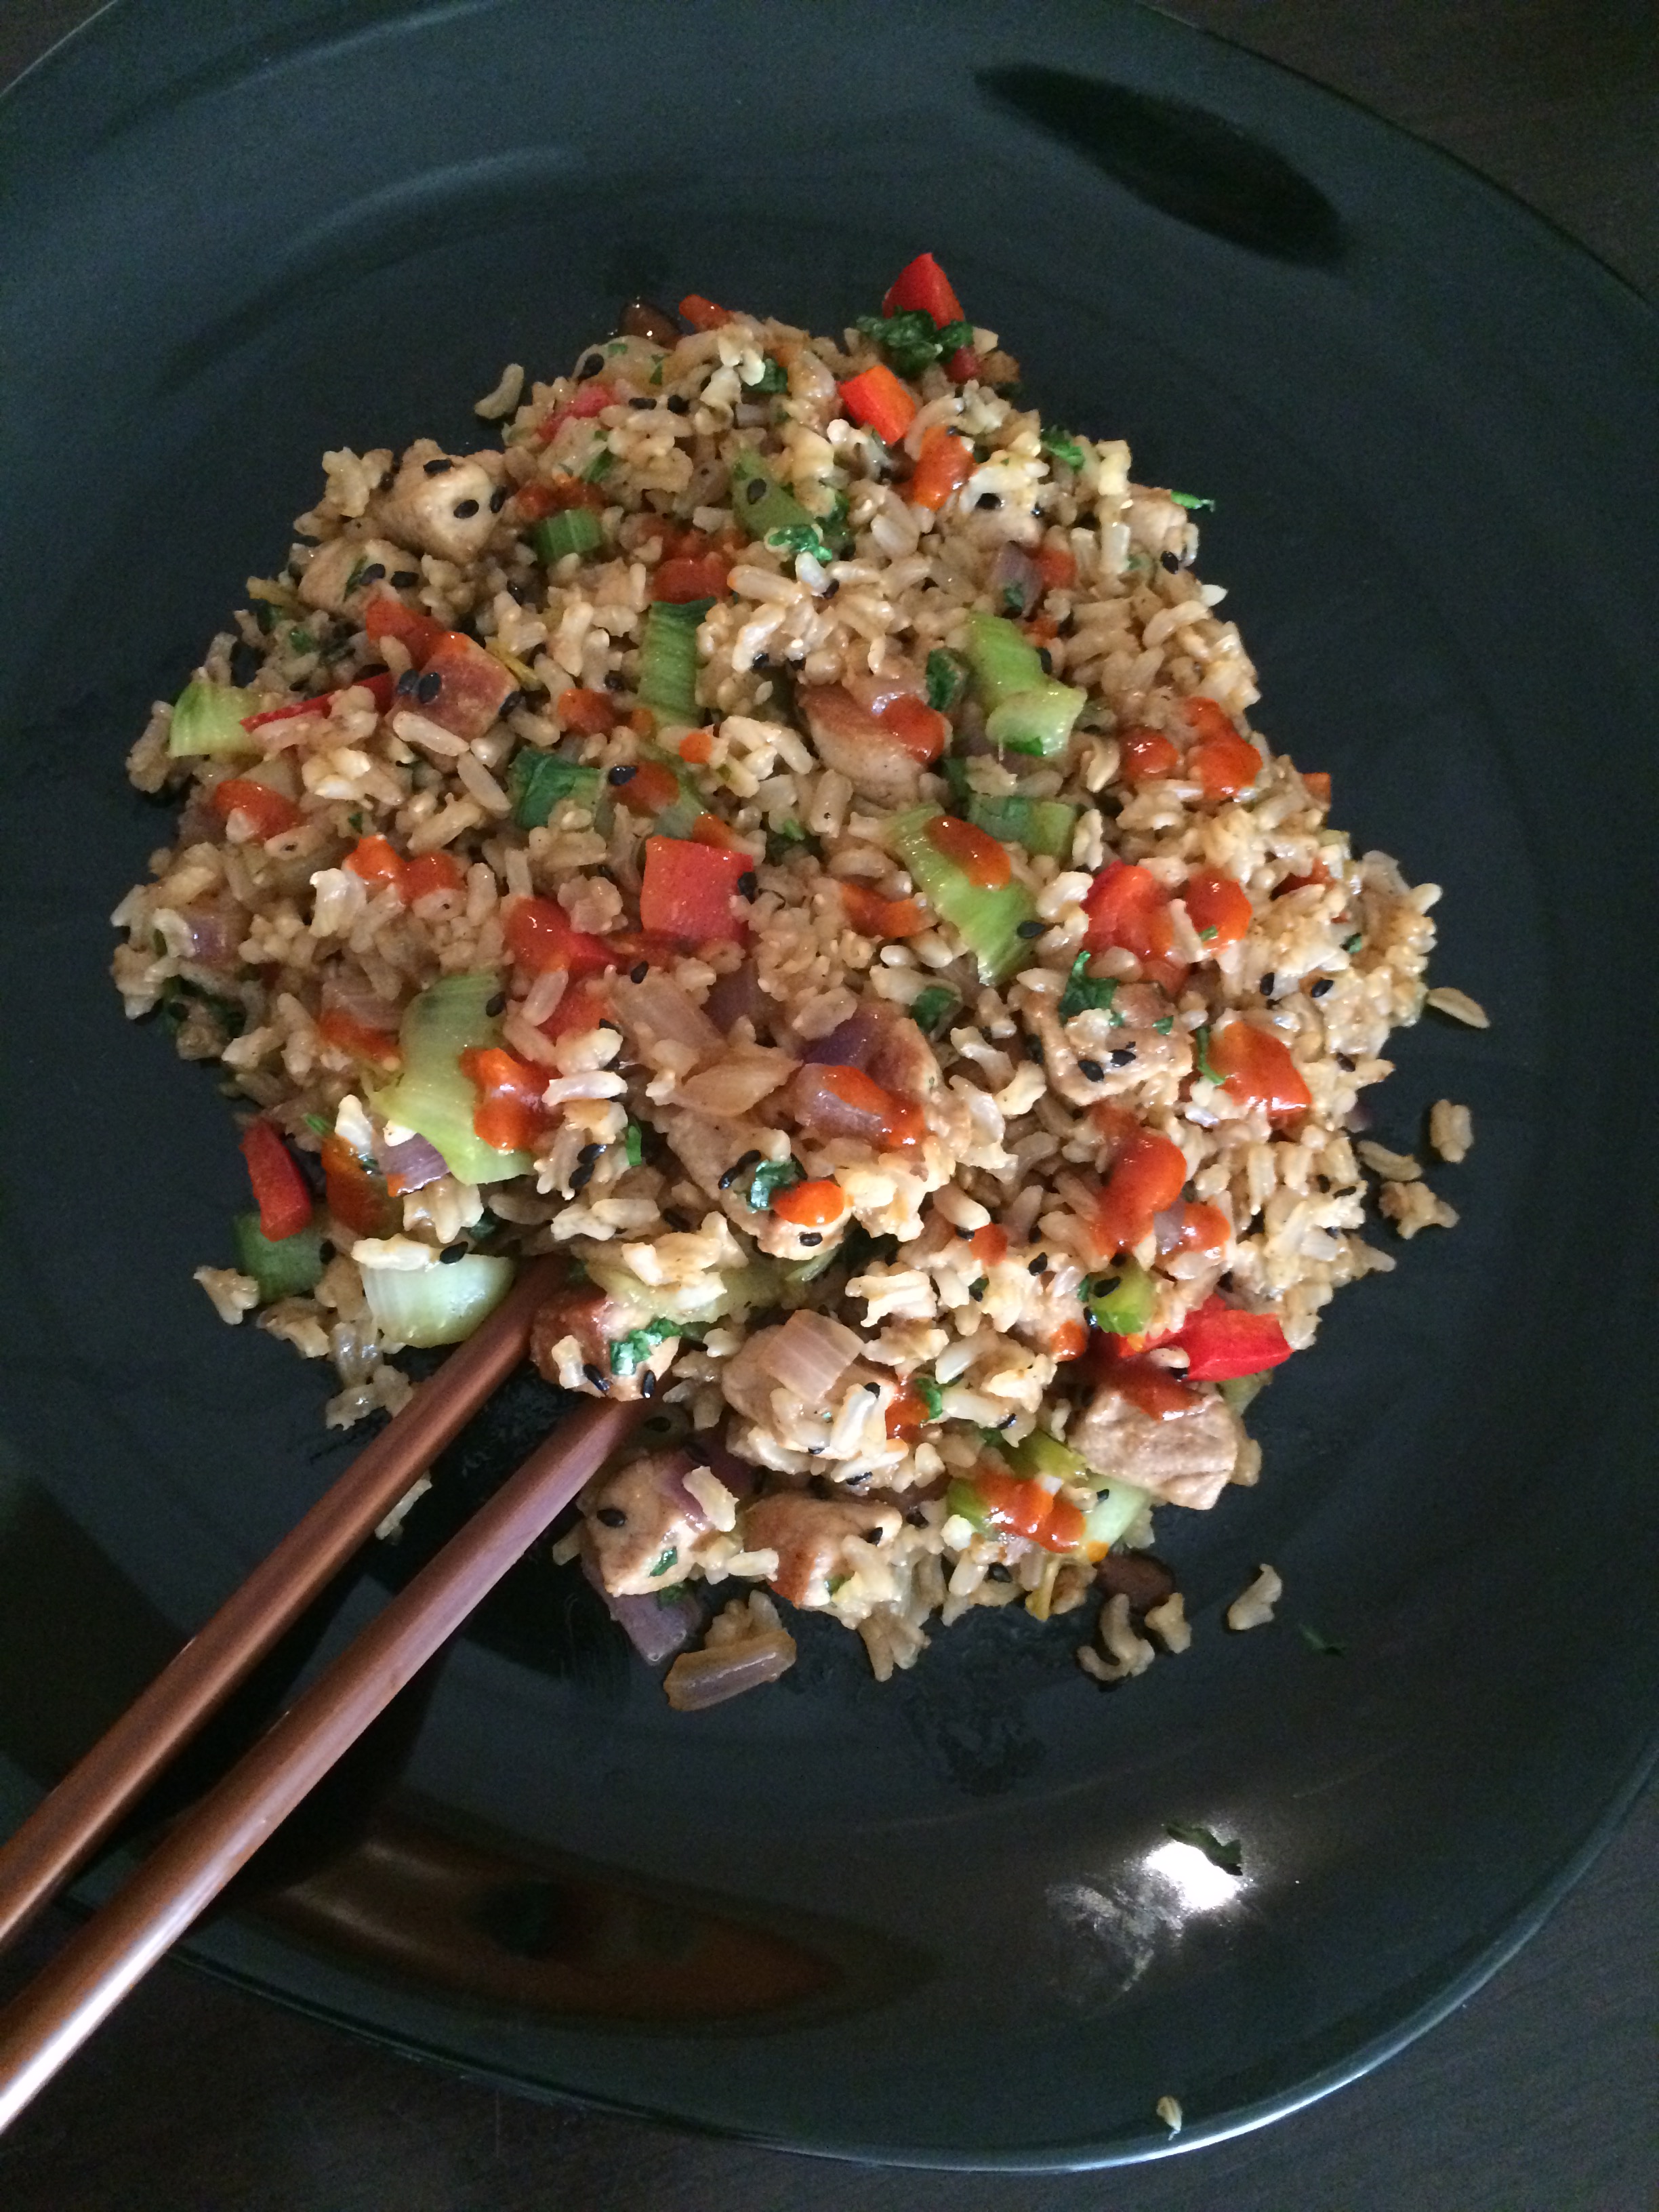
Add the soya sauce and Sriracha and pepper and mix with a scooping motion until the rice is evenly coated with sauce. You will have to break up any remaining clumps of rice with the spatula as best as possible, but no need to be obsessive. The rice should be hot by this time.  I often let this sit for a minute and let the rice on the bottom of the wok get all crispy, this adds a great texture to the rice.

Toss in your eggs, cilantro and black sesame seed. Mix thoroughly for another minute or two and serve!

Between 2 Slices

I think I have shared this many times before but I am a sucker for food that comes in packaging.  I realize that sounds weird, but think dim sum dumplings, pierogis, ravioli, empanadas and the list goes on.  Of course this morning I felt the desire to satisfy my need for food in packaging and so the hubby (very willingly I might add) and I decided we needed to visit Pearl Court.  Located in the East End of Toronto (on the east side of the DVP) at Broadview and Gerrard is the East Chinatown and home to Pearl Court, my dim sum happy place.  On weekends they bring out the dim sum carts and food is rolled past you tempting you to try things like the usual Har Gow and Sui Mai, but also chicken feet in oyster sauce and cow tripe with ginger.  For $30 we left very full and satisfied.

So then I was thinking it might be fun to do another themed menu board and I thought about all the things that come in packages. Perhaps the most well known and versatile package is good old bread. So this week we are sticking everything between 2 slices and calling it the Sandwich Board!

Menu Board Week of May 24th

While I doubt any of you need me to define what makes a sandwich I would imagine you are not as familiar with its history.  The first written usage of the English word appeared in Edward Gibbon’s journal, in longhand, referring to “bits of cold meat” as a “Sandwich”. It was named after John Montagu, 4th Earl of Sandwich, an 18th-century English aristocrat. It is rumoured that he ordered his staff to bring him meat tucked between two pieces of bread, and others, in the fashion of When Harry Met Sally, began to order what Sandwich was having.  It is said that Lord Sandwich was fond of this food as it allowed him to continue playing cards, particularly cribbage, while eating, without using a fork, and without getting his cards greasy from eating meat with his bare hands.  You simply can’t argue with him.  That is why sandwiches are so convenient for picnics.

We tend to eat a lot of sandwiches around these parts so it was not hard to come up with a series of sammies to include for this week.  From this week’s menu bored I think I am most excited about the green goddess sandwich which has a tangy herbed mayo and lots of veggies, and the hubby, well this shouldn’t come as a surprise, is excited for the chicken IN waffles sandwich, a fried chicken breast between 2 waffles and topped with spicy maple syrup.  Be sure to check out my Instagram account for pictures of all this week’s sandwiches.

Cream Ale
Bell City Eureka Cream Ale

And what goes best with a sandwich  Why a beer of course!  This weekend the beer of choice was the Bell City Eureka Cream Ale.  Bell City is based out of Brantford where there is a brewery, tap room and sales area. Named Bell City, for the city where Alexander Graham Bell invented the telephone, this brewery names their beer after inventors.  Their flagship beer, the Eureka Cream Ale is the only beer currently available in LCBOs (about 100 in Ontario) but is also becoming more and more available is restaurants in the GTA including some of our nearby favourites like Mugshot Tavern and Tallboys.  The Cream Ale is a pre-prohibition ale that is creamy with a velvety mouth feel with a good depth of malt and hops.  Simply put, thirst quenching on a hot Sunday afternoon as I prep fried chicken in my tiny kitchen.

Holy Mole!

During a past life (career wise) I spent a lot of time in Mexico and have always been a big fan of their bright flavours and simple ingredients.   Anything with cilantro is alright in my books.  I am not talking about nachos (though those do hit the spot on a patio on a Saturday with a pitcher of beer) or the other things you find at Taco Bell. Mexican food is so much more than Tacos.   I am talking about honest to goodness Mexican food at its finest.

Shredding Chicken

Mole has to be one of those gems that I discovered during my time in Mexico.   All moles are very time consuming, labor intensive and require many ingredients. Some sources state that some moles have as many as 100 ingredients, but that’s an exaggeration. But 30 ingredients is not unheard of, and some mole recipes contain 10 different varieties of chiles alone. Other ingredients include: peanuts, almonds, fried bread, plantains, lard, sugar, bittersweet chocolate, cinnamon, cloves and many more. 

 Rumour has it that the story behind this sauce is of two nuns surprised by a visitor (some claim it was the Archbishop). They had little in the way of food and so they used a molcajete (mexican mortar and pestle) to grind every ingredient they could find and simmered it in liquid until it thickened into a sauce.

However it came to be it is a staple in our house. Sometimes we share it with visitors. Below is a simple Mole sauce. We serve it with shredded chicken and turn it into tacos, but it doesn’t always need to be tacos to be Mexican.

Easy Mole Sauce


Chicken Mole Tacos
 

Ingredients

  • 5 dried pasilla or ancho chiles, stemmed and seeded
  • Two 6-inch corn tortillas, or handful regular tortilla chips
  • 2 tablespoons olive oil
  • 1 1/2 medium onions, chopped
  • Kosher salt
  • 2 cloves garlic, minced
  • 1 onion, chopped
  • 2 tablespoons smooth almond butter
  • 2 Tbsp chili powder
  • 1 tsp ground cinnamon
  • 1 tsp ground coriander
  • 1 tsp ground cumin
  • 1/4 tsp ground nutmeg
  • 1 teaspoon dried oregano
  • 1 3/4 cups chicken stock
  • One 3.1-ounce disk dark chocolate, chopped
  • Freshly ground black pepper

Directions 

  •  Reconstitute the dried chiles by soaking them in 1 1/2 cups hot water for 15 minutes. Then drain and set aside. 
  •  Toast the corn tortillas in a dry skillet until dry, crisp and golden. Tear into pieces and set aside.
  •  In the same skillet, heat the oil over medium heat. Add the onions, season with a little salt and sauté until translucent, about 3 minutes. Then add the garlic and cook 2 minutes more. 
  •  Transfer the onion and garlic mixture to a blender with the chiles, tortillas, peanut butter and spices. Pour the chicken stock over and blend until very smooth. 
  •  Then transfer the sauce to a medium sauté pan and bring to a boil over high heat. Reduce the heat to medium, cover and simmer 20 minutes. Stir in the chocolate. Season the mole with salt and pepper.

Absence Makes the Stomach Grumble…for Curried Fish Pie

It has been a couple of weeks since I posted and it has been this first time I have missed a whole week.  A lot happened in that time and I have been keeping photos of the boards and pictures of food.  You can follow my Instagram account to see photos of food I make, that doesn’t necessarily make it into the blog.

CEL Farewell Italian Dinner

This past year I had a group of amazing students work for me and I could not have been more grateful for everything they brought to the programs we ran together.  When I asked what they wanted to do to celebrate the end of the year they asked me to cook for them.  This took some negotiation as I live in the city, most of them live outside, I don’t have enough plates to feed them all and fitting them all in my 685 sq. ft. condo seemed daunting.  Despite all this they managed to convince me….but to be honest it wasn’t really that hard of a sell.

I asked them to complete a poll to let me know what they would like to have.  Italian was the winner.  You can see the menu here.  The dinner was a wonderful end to a year that I can’t put into words, so instead I put it into my food.  I will miss them all and can’t wait to see what amazing things they accomplish in the future.  That is the essence of why I love working with students.

Menu Board Week of  May 3
Menu Board Week of May 3

This past week was a bit of a hodge podge menu board.  Mostly inspired by a shop to Costco.  For all the things that Costco is and isn’t I love buying mushrooms there.  I know lots of people who go for other bulk things, but me, it’s portabello’s everytime!

It was also Cinco De Mayo on Tuesday so I obviously had to make Mexican.  Margaritas and Chicken Mole Enchilada’s absolutely hit the mark.  They were delicious.  If you have never had mole stay tuned this week for a Mole Tacos recipe I will share as I have left over sauce.  I always make too much.

I also reached for my trusty Jamie Oliver Comfort Food Cookbook this week for the Curried Fish Pie.  Fish pie is a traditional British dish. The pie is usually made with white, often smoked, fish (for example cod, haddock or halibut) in a white sauce or cheddar cheese sauce made using the milk the fish was poached in. Prawns and hard boiled eggs are other common additional ingredients. It is oven-baked in a deep dish but is not usually made with the shortcrust or puff pastry casing that is associated with most savoury pies (e.g. steak and kidney pie).

I adapted the recipe a little to suit our eating preferences and ingredient availability (omitting the eggs, and using Haddock).   I really enjoyed the flavours but found the pie a little wet.  Maybe it was because I had used frozen fish.  All in all a good one, and worth revisiting, with some fresh seafood.

Curried Fish Pie

adapted from Jamie Oliver’s Comfort Food

Coconut Curry Sauce for Pie

Ingredients

Potato Mash

  • 2 large Russet Potatoes
  • 1 small knob of unsalted butter
  • semi-skimmed milk

Sauce & Pie

  • 4 cloves of garlic
  • 1-2 fresh red chillies
  • coconut oil
  • 2 small handfuls of curry leaves
  • 1 1/2 teaspoons black mustard seeds
  • 2 onions
  • 1 thumb-sized piece of ginger
  • 1 teaspoon fenugreek seeds
  • 1 teaspoon turmeric
  • 1 X 400 g tin of light coconut milk
  • 200 g baby spinach
  • 1/2 lemon
  • 1/2 pint of grape tomatoes
  • 2 haddock fillets
  • 12 black tiger shrimp
Fish Pie Plated
Fish Pie Plated

Directions

For the sauce, sauté the first 9 ingredients on a medium heat in a frying pan for about 10-15 minutes, this will give the onions a nice caramelized flavour. Add the coconut milk and spinach and cook for a few minutes to thicken. Top with the fresh tomatoes and remove from the heat –  pour the sauce into a deep oven dish at least 20cm x 20cm and leave to cool.

Peel and roughly chop the potatoes and cook in boiling salted water for 12 to 15 minutes, or until tender. Once cooked, drain the potatoes and mash really well with the butter, a few splashes of milk and a pinch of sea salt and pepper.  This can be done ahead of the pie preparation.

Preheat the oven to 180°C/350°F/gas 4.

Cut all the fish into bite-sized chunks, and intersperse around the dish with the shrimp. Squeeze over the lemon and top the whole thing with your mash – scuff it up with a fork to create a larger surface area for crispiness.

Bake for 40 minutes, or until golden and bubbling at the edges.

Foodcation

This week I am enjoying a week off (well enjoyment would be greater if it would stop raining!). It is a staycation. They often are as my partner does not get as much vacation time as I am fortunate to have.  My vacations (at home and abroad) usually revolve around food.  Not that that should come as a surprise to any of you reading this blog.

Menu Board for Week of April 20-24

On foodcations I usually engage in a variety of food activities.  I will typically try my hand at making things that are labour intensive (as I have the time) and that I have always wanted to try.  This week that big ticket item is Ramen.  We often find ourselves at Kinton at least twice a month and more often in the winter when all you want is warm slurpy noodles and decadent broth.

I figured it wouldn’t hurt to try my hand at making my own broth.  I know it won’t taste like Kinton, but chances are it won’t be terrible (fingers crossed) and if it is, Kinton is not far away.

On foodcations I also often also eat out.  Again not a surprise, but I don’t often talk about the places we eat in this blog.  Foodcations are a great opportunity to try out restaurants you have been wanting to go to, but that might require a reservation or that you just can’t seem to get to for whatever reason.  One such place I went to today.

Mean Bao - Pork Belly and Braised Beef
Mean Bao – Pork Belly and Braised Beef

It is not a bustling, trendy, hard to get into place, but it is one I have been meaning to get to for awhile.  Mean Bao is small with limited seating, has only a handful of items on their menu (mostly bao and dumplings) but delivers a flavour packed punch in a wrapper.  I am a SUCKER for anything that comes in a food package….pierogi’s, stuffed pasta like ravioli, dumplings, patties you name it, if it comes in a food made package I will eat it and probably love it.  I tried the pork belly bao, because well, it’s pork belly, nuff said. I also tried the braised beef bao.  Both were delicious and had a good ratio of bun, meat and veg.  I opted to only have 2 bao, but could easily have eaten the whole menu.  I found the bao to be larger than some of the more “trendy” competitors *cough* momofuku *cough* and the pork belly to be more plentiful.  Definitely glad I was able to make the time to get there….now I just need to make the time to get back and try everything else on the menu!

Keeping on the food package train I tried my hand at making a Po’boy sandwich.  This past weekend marked mine and the hubby’s 6 month wedding anniversary and it had me nostalgic for our honeymoon which was spent in New Orleans doing what we do best, eating and drinking. Recipe is below.

Have you ever had a foodcation?  What did you do, where did you eat?  I would love to know.

Calamari Po’Boy

Ingredients

Calamari Po'boy
Calamari Po’boy

Calamari

  • 2 cups canola oil
  • 3/4 cup semolina flour
  • 1/2 cup all-purpose flour
  • Salt and freshly ground pepper
  • 1 1/2 pounds calamari rings

Sandwich

  • Baguette, cut into 6″ buns
  • Coleslaw (dressed however you prefer)
  • Hot Sauce
  • Sliced Pickles
  • Cilantro

Directions

– In a large heavy-bottomed skillet, heat the canola oil over medium-high heat to 360 degrees F.
– In a large bowl, stir together the cornstarch and flour with a generous amount of salt and pepper. Toss the squid in the cornstarch, being sure to completely coat.
– Working in batches, lift the squid from the cornstarch, shaking to remove any excess, and carefully place in the oil. Fry until lightly golden and crisp, 3 to 4 minutes. Remove from the oil and drain on a p lined with papertowel. Repeat with the remaining squid.
– Toast the buns in the oven under the broiler until they are crispy and just starting to brown.
– Fill the buns with the coleslaw. Top with pickles and calamari. Add hot sauce and cilantro and dig in!

Do over, not leftover

Lately I have been experimenting with not just reheating a meal, but using the remaining food in another way.  I have been doubling a few ingredients or full meals over the last little while to experiment with this.  So what does that mean for this week’s menu board….double butter chicken goodness!

Menu Board Week of April 12th

Earlier in the week I made Butter Chicken.  For those of you who pay close attention to my menu boards you will notice I make a lot of butter chicken. I am trying to perfect it. I have found a good recipe that I am trying to make better.  Sometimes it has too much tomatoes flavour, sometimes too much cream flavour.  One day I’ll get it!  When I do…I will post it!

But for the sake of today’s post I am talking about transforming leftovers into not just leftover, but do overs.  The Leftovers is a great TV show, but I digress, today is about food, good food, Indian food, pizza food.

We make a lot of pizza in our house. In fact it is said to be a Friday tradition.  It took awhile but we have found a homemade pizza dough that works well for us (recipe below).  It makes a huge amount of dough so depending on how thick you like to (we like it thin) you can either cut it in half and freeze it, or make a thick crusted za!

To make this leftover into a do over make your crust, top it with leftover butter chicken, heck you can use any indian leftovers…saag paneer pizza, yum….chicken tikka masala pizza, also yum!  Then top it with some sliced green onions and a little mozzarella.  You don’t want to go heavy on the cheese with this pizza, it doesn’t strike the right balance with the indian, at least not for me.  Then once it is out of the oven top it with cilantro and some extra hot sauce if you are feeling spicy.  You can’t really go wrong.  It’s no different than eating butter chicken with naan, it’s just pizza, which makes everything better.

Pizza Dough

Ingredients

Butter Chicken Pizza
  • 2 1/4 teaspoons active dry yeast
  • 1/2 teaspoon honey
  • 1 1/2 cups warm water
  • 1 teaspoon salt
  • 2 tablespoons olive oil
  • approx 3 1/2 cups all-purpose flour

Directions

  • In the bowl of your Stand Mixer (or large bowl if you do not have a mixer), dissolve the yeast and honey in the water, and let sit for 10 minutes.
  • Stir the salt and oil into the yeast solution. Mix in 2 1/2 cups of the flour using the flat beater of your mixer.
  • Use your kneading attachment and knead in more flour until the dough is no longer sticky.  This can be anywhere from 1 cup to 1 1/2 cups.  Take it slow and keep an eye on your dough.  When it pulls away from the sides of the mixer and forms a ball you have enough flour.
  • Place the dough into a well oiled bowl, and cover with a cloth. Let the dough rise until double; this should take about 1 hour. Punch down the dough, cut in half and form 2 tight balls.   Use one and put the other in the freezer for another day (or if you want a thick crust, use both!).  Allow the dough to relax for a minute before rolling out.
  • Top with your favourite toppings (in this case butter chicken and mozzarella) and cook in a 425 degree over about 15-20 minutes.

Easter

Easter Menu Board
Easter Menu Board

I am sure that many of you, like me, are busy with family functions over Easter.  Dinner with my family and dinner with the husband’s family always requires strategic coordination.  This year my family went rogue.  No ham, turkey or lamb for us, no one wanted to cook a big meal.  We went to Mandarin.  Slightly sacrilege I suppose, but makes everyone in my picky eating family happy.  Plus we don’t celebrate the traditional Easter, we celebrate the chocolate Easter.

On Sunday however we cooked dinner for my husband’s side of the family and you can see the board here.  The carrot cake was probably my favourite part of the meal.  The carrot cake was vegan, and no one knew until I told them.

Menu Board Week of April 6th

We also ended up with lots of leftovers, which made for a shorter menu board this week.  Plus this week is a bit hectic and so I went for some quick and lazy dinners.  Nothing is terribly inspired, but everything tastes good.  Like last night’s dinner for example.  Pierogi’s! I mean yum.  I do know how to make them from scratch (I was fortunate to have a lesson directly from a friend’s Polish mother-in-law), and I often do when I have a whole weekend without other commitments. However they recently had a deal on at Costco so we bought some pre-made frozen.  You always need to have those things in your freezer you can just whip up on a busy night.

In an effort not to fully phone it in I did make a warm spinach salad to go with the boiled dumplings.  Nothing a little bacon and fried onions can’t fix and make feel like homemade goodness.

Pierogi's with warm spinach salad and sour cream
Pierogi’s with warm spinach salad and sour cream

Warm Spinach Salad

Ingredients

  • 8 ounces baby spinach
  • 8 pieces thick-sliced bacon, chopped
  • 3 tablespoons apple cider vinegar
  • 1 teaspoon sugar
  • 1/2 teaspoon Dijon mustard
  • Kosher salt and freshly ground black pepper
  • Onion (1 small), very thinly sliced
  • 20-24 boiled pierogi’s (we used Pelmen Foods)
  • Sour cream (we used lactose free)

Directions

  • Fry the bacon on medium high heat.  Remove from the pan and reserve on a paper towel lined plate.  Remove all but 3 tbsp of bacon fat, leave in pan to cook onions.
  • Add onions to the pan and sauté until starting to brown.
  • Whisk in vinegar, sugar and mustard to make a vinaigrette.
  • Add spinach and coast well in vinaigrette.  Allow to wilt to your preference.
  • Add bacon and combine.  Spoon over top of pierogi’s.  Top with sour cream. Enjoy 🙂

Oh My Pot Pie!

I am already behind on my promise last week to keep on top of the blog.  Damn you Kevin Spacey and House of Cards!  Netflix is both my love and my curse.  I have never been good with things that I can binge on…it is why I stay away from buffets.

Menu Board for week of March 29th

This week is a short one, thank goodness for a four day week!  So that also means a shortened menu board.

The recipe I want to share with you tonight is a good one, if you like mushrooms, which I am surprised how many people do not!  Mushrooms are a fungus, so perhaps people are turned off by that, or the fact that it grows best in manure, or it is just a texture thing.  The thing I love most about mushrooms is that they are neither plant, or animal.  They belong to the ‘fungi’ kingdom which includes bacteria and yeast.

I love mushrooms, they are a favourite and are often used in this kitchen as a meat substitute.  This recipe is full of em.   Chicken and Mushroom Pie, you’ll love it too.  Pot pie’s have a long history and are ubiquitously British.  During the Roman Empire times meat pies were served at banquets and it has been said they would put live birds under the crust.

Chicken and Mushroom Pot Pie

Ingredients

  • 2 tablespoons olive oil

    IMG_0037
    Sautéing veggies
  • 2 tablespoons butter
  • 1 leek, thinly sliced
  • 2 large portabello caps, chopped
  • 2 stalks celery, finely diced
  • 1 clove garlic, minced
  • 2 tablespoons flour
  • 1 1/2 cups shredded cooked chicken
  • 1 cup chicken stock
  • 1/4 cup cashew cream (or half and half)
  • zest of 1/2 lemon
  • 1 teaspoon fresh minced thyme
  • 10 oz puff pastry

Directions

  1. Preheat oven to 400F degrees.
  2. In a medium cast iron pan, heat butter and olive oil over medium heat. Add leek and cook 5 minutes. Add mushrooms and celery and cook 10 minutes more until soft and starting to brown. Add garlic and cook 1 minute.
  3. Add flour and cook, stirring constantly, 1-2 minutes.
  4. Add shredded chicken and chicken stock; turn heat to medium high and cook, stirring occasionally until mixture thickens a bit about 2 minutes. Turn heat off, stir in cashew cream, lemon zest and thyme. Season with salt and pepper to taste.
  5. Either transfer mixture to another pot or leave in cast iron and let cool. Top with puff pastry, crimping the edges around the pan.
  6. Cook for 25-30 minutes until puff pastry is puffy and golden on top. Remove from oven and let cool 10 minutes before cutting into!
Chicken Pot Pie
Chicken Pot Pie

Burger Pressed

I have been falling behind again readers and I am sorry.  Maybe it’s the rain, maybe it’s the time of year at work, or maybe it’s the fact that I recently started watching House of Cards. But I apologize.  I will not be so lax with my posts.

Last week we tried an experiment with a fully vegan menu board. I had a lot of fun trying out some new twists on classics like Mac and Cheese and Curried Quinoa.  My partner (a die hard meat eater) fared well.  He didn’t complain about not having meat.  Once he asked if I could please add bacon, to the Mac and Cheese of course, but that was it for rumblings.  Overall it was a good week, we were satisfied, and maybe our bodies will thank us for it.

Menu Board for week of March 22nd

But this week we are back to meat eating.  Not a lot of meat mind you, snuck 2 vegan dishes in there this week.

I am really excited about the General Tso’s Chicken.  I love good Chinese food, but find it hard to replicate the same flavours at home.  Maybe because I don’t want to fry everything.  I will post tomorrow about the recipe and let you know how it goes.  Fingers crossed it goes well.

I hate to waste leftovers, but I also hate to reheat food.  It’s an odd combo I know, but I am lucky to have a garbage disposal husband who will pretty much eat anything left in the fridge if I give him the go ahead.

So after last week’s dishes I ended up left with some refried chipotle black beans from our tacos.

Burger Patties
Burger Patties

You can check out the recipe I used for the black beans (done in the slow cooker) on the blog One Lovely Life.

It seemed logical to turn them into burgers.  I cooked up some quinoa and added that and leftover arugula to the mix.  I then made them into patties, put them on a cookie sheet to bake.  You could fry them, but I find that without egg they get a little fragile and end up falling apart.  The oven does a great job.  400 for 25 minutes or so until they develop a crust.

Top your burgers with your favourite toppings.  Ours included guacamole, chipotle “cheese” sauce made from cashew cream (also a leftover from the mac and cheese), some kale, swiss chard and spinach salad blend and a slice of tomato.  My partner also added some hot sauce onto his.  Add a side of paprika hashbrowns and a beer to wash it down, voila, it’s burger night!

Burger and a Beer
Burger and a Beer

Get it Ripe

Did you know that you are supposed to eat 4 servings of leafy greens a week, or that omega-3s reduce inflammation or that you can sprout lentils?  Neither did (okay maybe I knew about the leafy greens) until I picked up the cookbook Get it Ripe by jae steele.

Cookbook
Cookbook

Get it Ripe was one of the first few vegan cookbooks I grabbed when I was told I needed to stop eating eggs and milk.  It was recommended to me by my Naturopath as a great book to figure out how to make substitutions in my baking.  And while this book is excellent for that (seriously good desserts, you won’t notice there is no butter!) and I got a lot of great recipes, what I really love about this book is it taught me how to eat.  The first 100 pages of the book are dedicated to teaching the reader about vegan whole foods diets, shopping locally and the skills you need to be an excellent vegan cook.  I don’t think I have ever learned as much from what I thought was a cookbook as I did reading Get it Ripe, I am also happy to support steele who is a Torontonian.  She is also a registered holistic nutritionist, and recently started studying to become a midwife.  In this book, steele’s tone is approachable and never judgmental and really made me feel like I could tackle changing the way I ate.  Her book includes a lot of gluten-free, soy-free, nightshade-free and raw/living recipes that make this a cookbook for anyone.  And I do feel like everyone should own it.

I have many favourite recipes in this book including the Simple Dal, Millet Stuffed Bell Peppers and Mocha Fudge Pudding Cake.  One year I made all my staff the Glazed Lemon Poppy Seed Cake as christmas gifts and not one believed me when I told them it was vegan.   That is my favourite trick to play.  Tonight I made one that rotates through our list of favourites quite often – Sesame Kale Soba.  It is a super quick 15 minute meal and includes some ingredients you might not have tried, or might be intimidated to try.

Sautéed Kale and Shitake Mushrooms

The main ingredient in this dish is Soba Noodles.  You have probably seen them in your grocery store.  They look like brown spaghetti and are often found in the asian ingredients section.  Soba (which is Japanese for buckwheat) noodles are made from buckwheat flour and are often served hot with a broth or cold with a dipping sauce.  These noodles have a nutty flavour that distinguishes them from your regular pasta and can be gluten free which makes it a nice alternative, just make sure to check the packaging to be sure.

The other two ingredients (that can be kind of optional if they really scare you, or you can’t find them) are dulse and  arame.  Dulse is a red alga and can be dried and made into a powder (which is what is called for in this recipe) and adds a spicy salty flavour.  Arame is a sea vegetable and is a species of kelp and a great way to incorporate more seaweed into your diet.  Typically it comes in a dried state and you would need to rehydrate it for a about 5 minutes for this recipe.  Finally I added shitake mushrooms, which are not included in this recipe, but I love the earthy flavour so I often add them in.  You can make this dish hot or cold, which makes for a great picnic salad.

Sesame Kale Soba

Sesame Kale Soba
Sesame Kale Soba

Ingredients

  • 1 bunch green or black kale
  • 1 1/2 cups of shitake mushrooms roughly chopped
  • 1 8oz package of soba noodles
  • 3 tbsp tamari (or if you can’t find this you can substitute with 2 tbsp soya sauce and 1 tbsp water to lighten the salt content)
  • 3 tbsp of sesame oil
  • 1 clove of garlic grated or pressed
  • 1/2 tsp dulse (optional)
  • freshly ground black pepper to taste
  • 1/4 cup arame, rehydrated (optional)
  • 3 tbsp unhulled sesame seeds

Directions

Place a large pot of water on high heat to boil.  Wash kale, remove stems and shop.  Remove stems from mushrooms (these are chewy and not something you want to eat) and roughly chop.

Add the noodles to the water and cook for approx 6-7 minutes, checking for an “al-dente” doneness.  Sauté the mushrooms in a pan for about 5 minutes, add kale and cook together until kale is wilted and starting to crisp.  Toss veggies with drained noodles and separate into bowls.

Combine the tamari, oil, garlic, dulse and pepper in a small bowl.  Mix well and pour over noodles.  Toss gently and top with sesame seeds and arame.

**adapted from Get it Ripe by jae steele